Select all checkbox using javascript in visualforce page Javascript can be used in visualforce pages to select all checkboxes in visualforce table. This example uses javascript to implement this functionality. Click for demo Visualforce Page: …
Future Methods in Salesforce @future Future Methods in Salesforce using @future annotation A future method runs in the background, asynchronously. You can call a future method for executing long-running operations, such as callouts to external …
custom label in apex code salesforce example We can use System.Label.labelName to access custom label in apex code. Custom labels are custom text values that can be accessed from Apex classes or Visualforce pages. The …
Salesforce Interview questions and answers 2022 Salesforce Interview questions and answers 2022 In this post, we will try to cover all Salesforce interview questions and answers related to Salesforce Admin, Salesforce Development, Salesforce Lightning. Here …
System.NullPointerException: Attempt to de-reference a null object How to solve System.NullPointerException: Attempt to de-reference a null object error System.NullPointerException: Attempt to de-reference a null object is very common error in apex class. It occurs when your variable …
WhoID in Salesforce refers to people things. So that would be typically a Lead ID or a Contact ID. The WhoId represents a human such as a lead or a contact. WhoIds are polymorphic. Polymorphic means a WhoId is equivalent to a contact’s ID or a lead’s ID. The label is Name.
WhatID in Salesforce refers to object type things. That would typically be an Account ID or an Opportunity ID. The WhatId represents nonhuman objects such as accounts, opportunities, campaigns, cases, or custom objects. WhatIds are polymorphic. Polymorphic means a WhatId is equivalent to the ID of a related object. The label is Related To.
Please check below image for the object diagram:
Difference between WhoId and WhatId
These fields are available on Task and Event Object. In SOQL query these fields can simply be queries similar to other fields.
How To Display Lightning Component In Visualforce Page
In this post, we will see how we can use Lightning Components in Visualforce Pages or how to display Lightning Component In Visualforce Page. Even though the use of lightning is growing day by day, still some customers are using salesforce classic because of many reasons. Sometimes there is a requirement to use lightning component in visualforce page.
Lightning Components for Visualforce is based on Lightning Out, a powerful and flexible feature that lets you embed Lightning components into almost any web page. When used with Visualforce, some of the details become simpler. For example, you don’t need to deal with authentication, and you don’t need to configure a Connected App.
In this example, we will see a very basic example of the lightning component and then display lightning component in the visualforce page.
Lightning Component LightExample1
<aura:component>
    <div>
        <h1> This is lightning component for visualforce page</h1>
    </div>
</aura:component>
Lightning App LightExampleApp1
Here important point is that ltng:outApp needs to be extended in app.
ltng:outApp adds SLDS resources to the page to allow our Lightning components to be styled with the Salesforce Lightning Design System. If we don’t want SLDS resources added to the page, we need to extend from ltng:outAppUnstyled instead.
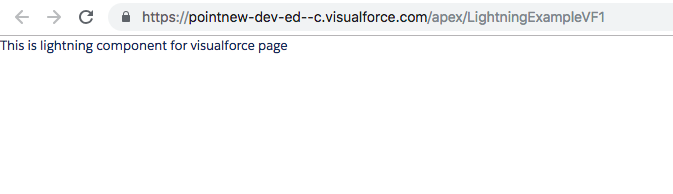
Use Lightning Components in Visualforce Pages output
Use Lightning Components in Visualforce Pages output
In the above Visualforce page, apex:includeLightning tag imports necessary dependencies and scripts to enable Visualforce to act as Lightning component container.
We can use $Lightning.use() method in JavaScript to refer to Lightning Application which extends ltng:outApp.
We can use $Lightning.createComponent create Lightning Component dynamically.
We can call $Lightning.use() multiple times on a page, but all calls must reference the same Lightning dependency app.
A wrapper or container class is a class, a data structure, or an abstract data type which contains different objects or collection of objects as its members. In this post we will see how we can use wrapper class in lightning component to display data in lightning component. For details about how we can use wrapper class in visualforce page check wrapper class in Apex
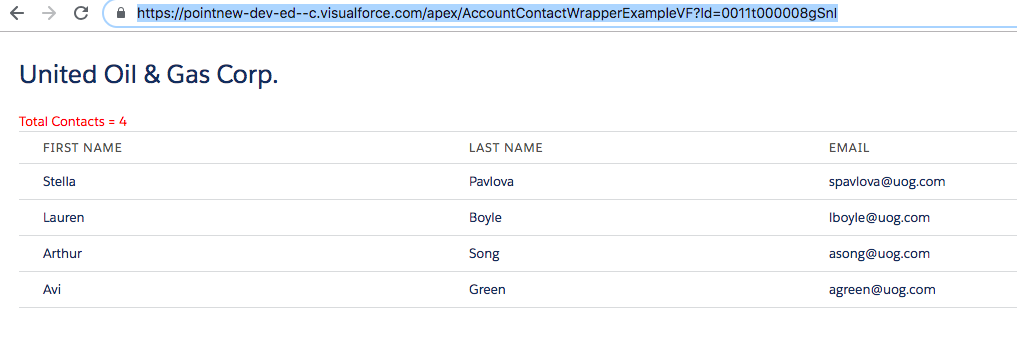
Let’s see an example of wrapper class in lightning component salesforce. In this example, we will create AcoountContactWrapper and will display account and contact details and display on lightning component.
Apex class controller with the wrapper class
AccountContactController.cls
public class AccountContactController{

    @AuraEnabled
    public static AccountContactListWrapper getAccountWithContacts(String accountId){
        AccountContactListWrapper accWrapper = new AccountContactListWrapper();
        List<Account> accList = [SELECT Id, Name, BillingState, Website, Phone,
                                    (SELECT Id, FirstName, LastName, Email From Contacts)
                                    FROM Account WHERE Id =: accountId];
        if(!accList.isEmpty()){
            accWrapper.accRecord = accList[0];
            accWrapper.contactList = accList[0].Contacts;
            accWrapper.contactCount = accList[0].Contacts.size();
        }
        return accWrapper;
    }

    // wrapper class with @AuraEnabled and {get;set;} properties
    public class AccountContactListWrapper{
        @AuraEnabled
        public Account accRecord{get;set;}
        @AuraEnabled
        public List<Contact> contactList{get;set;}
        @AuraEnabled
        public Integer contactCount{get;set;}
    }
}
Problem is Lightning components can’t use inner classes as attribute type when the org has setup a namespace. For more details refer below known issue link.
Salesforce Email service is automated process that use Apex class to process inbound email. When we set up an email service, we need to generate a special email address in which salesforce will receive your emails. We also need to create one apex class to implement Messaging.InboundEmailHandler interface . The email services will then invoke a handleInboundEmail method on the Apex class whenever an email is received on the email address.
salesforce email service example
Lets create very simple email service which will create contact when an email is sent to salesforce.
Steps to create email service
First of all we need to create Apex class that implement the Messaging.InboundEmailHandler interface. Its necessary to implement Messaging.InboundEmailHandler interface. Using the handleInboundEmail method in that class, you can access an InboundEmail object to retrieve the contents, headers, and attachments of inbound email messages, as well as perform many functions. This class will handle email message.
global class CreateContactFrmEmail implements Messaging.InboundEmailHandler {
    global Messaging.InboundEmailResult handleInboundEmail(Messaging.InboundEmail email,
                                                    Messaging.InboundEnvelope envelope) {
        Messaging.InboundEmailResult result = new Messaging.InboundEmailresult();
        String subToCompare = 'Create Contact';
        List<Attachment> attachmentList = new List<Attachment>();
        if(email.subject.equalsIgnoreCase(subToCompare)) {
            Contact c = new Contact();
            c.LastName = email.plainTextBody;
            insert c;

            // Save attachments, if any
            if(email.textAttachments!=null) {
                for (Messaging.Inboundemail.TextAttachment tAttachment : email.textAttachments) {
                    Attachment attachment = new Attachment();
                    attachment.Name = tAttachment.fileName;
                    attachment.Body = Blob.valueOf(tAttachment.body);
                    attachment.ParentId = c.Id;
                    attachmentList.add(attachment);
                }
            }

            //Save any Binary Attachment
            if(email.binaryAttachments!=null){
                for (Messaging.Inboundemail.BinaryAttachment bAttachment : email.binaryAttachments) {
                    Attachment attachment = new Attachment();
                    attachment.Name = bAttachment.fileName;
                    attachment.Body = bAttachment.body;
                    attachment.ParentId = c.Id;
                    attachmentList.add(attachment);
                }
            }

            if(!attachmentList.isEmpty()){
                insert attachmentList;
            }
        }
        result.success = true;
        return result;
    }
}
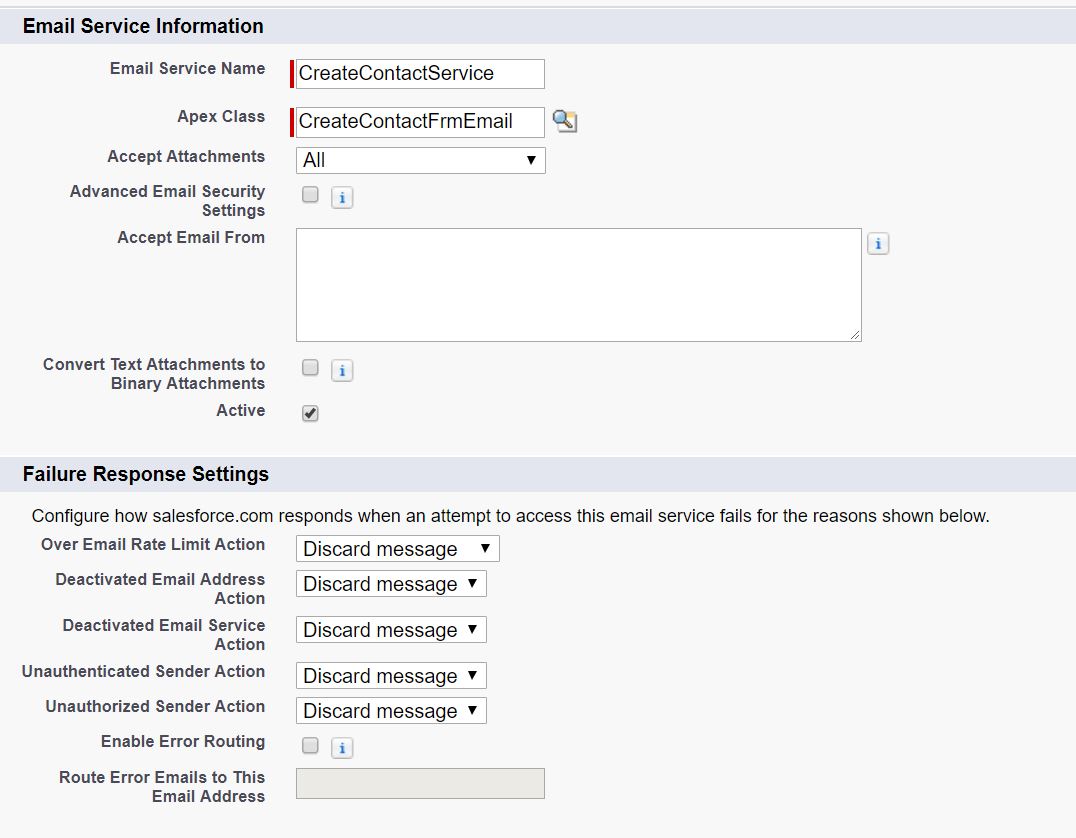
Create email service:
Go to setup -> Email Service -> New Email Service. Add following details as per this image
Click on Save or Save and New email address.
Generate an email address from email service record
Create new email address and add all details as per this image:
Click on save. New email address will be created in related list. We need to send email to generated email address to test email service. You can copy email address from email service related list so that we can use it for testing.
Testing email service by sending email:
For testing send an email to this email id with subject ‘Create Contact’ and add some body which will be saved in last name. We can also add attachment(its optional) in email. As contact last name is required field on contact object, so it is necessary to enter text body in email.
For more details about email service please this link from salesforce.
System.NullPointerException: Attempt to de-reference a null object
How to solve System.NullPointerException: Attempt to de-reference a null object error
System.NullPointerException: Attempt to de-reference a null object is very common error in apex class. It occurs when your variable (sobject, list, set or any other data type) is not initialized (allocated memory). In order to use the non primitive data type in the code we need to initialize the memory first. If we don’t do that it may result in Attempt to de-reference a null object error. This error may occur in Apex classes, Visualforce pages with Apex controller, Test classes, Apex Triggers.
For Example if I use like this:
Account acc;
acc.Name = 'sfdcpoint';
It will result in attempt to de-reference a null object error.
We should use it like this:
Account acc = new Account();
acc.Name = 'sfdcpoint';
When we use list or set then also we need to allocate memory to list or set like this
List<Account> accList = new List<Account>();
Set<String> strSet= new Set<String>();
Same way this error can occur when we get null result from map and we try to use it in our code. For example we have accountMap with Id as key and Account as value:
Above code will also result in error. Here in above code accountIdAccountMap or accRecord can be null. So we should do null check before using it like this.
It is also very good practice to use isEmpty() method like this:
if(!accList.isEmpty()){
     //Do your dml or other operations here
}
As a best practice we should always do exception handling in our code like this
try{
    //Code here
}catch(Exception e){
    //Handle exception here
}
If you get System.NullPointerException. Its advisable to use System.debug to debug line of code which is resulting in this error and then fix it.
We should also use try catch block and exception handling mechanism to handle any unexpected error like this. For more details about exception please refer exception handling
Assignment rules in salesforce are used to automatically assign lead or Case to owner(User Or Queue). Assignment rule is used to automate owner assignment on Case and Lead based on conditions on Case or Lead. For example, there could on lead assignment rule for web-generated leads and one case assignment rule for the holiday use.
Types of assignment rules
There are two type of assignment rules
Lead Assignment Rules
Case Assignment Rules
Lead Assignment Rules
Specify how leads are assigned to users or queues as they are created manually, captured from the web, or imported via the Data Import Wizard.
Case Assignment Rules
Determine how cases are assigned to users or put into queues as they are created manually, using Web-to-Case, Email-to-Case, On-Demand Email-to-Case, the Self-Service portal, the Customer Portal, Outlook, or Lotus Notes.
Create or Setup assignment rules
From Setup, enter Assignment Rules in the Quick Find box, then select either Lead Assignment Rules or Case Assignment Rules.
Choose New, and then give the rule a name. Specify whether you want this to be the active rule for leads or cases created manually and via the web and email. Then click Save.
To create the rule entries, click New. For each entry, you can specify:
Order : Sets the order in which the entry will be processed in the rule, for example, 1, 2, 3. Salesforce evaluates each entry in order and tries to match the criteria of the entry. As soon as a match is found, Salesforce processes the item and stops evaluating the rule entries for that item. If no match is found, the item is reassigned to either the default Web-to-Lead owner, the administrator doing a lead import, or the default case owner.
Criteria :Specifies conditions that the lead or case must match for it to be assigned.Enter your rule criteria.
Choose criteria are met and select the filter criteria that a record must meet to trigger the rule.For example, set a case filter to Priority equals High if you want case records with the Priority field marked High to trigger the rule. If your organization uses multiple languages, enter filter values in your organization’s default language. You can add up to 25 filter criteria, of up to 255 characters each. When you use picklists to specify filter criteria, the selected values are stored in the organization’s default language. If you edit or clone existing filter criteria, first set the Default Language on the Company Information page to the same language that was used to set the original filter criteria. Otherwise, the filter criteria may not be evaluated as expected.
Choose formula evaluates to true and enter a formula that returns a value of “True” or “False.” Salesforce triggers the rule if the formula returns “True.” For example, the formula AND(ISCHANGED( Priority ), ISPICKVAL (Priority, “High”) ) triggers a rule that changes the owner of a case when the Priority field is changed to High. If your condition uses a custom field, the rule entry will be deleted automatically if the custom field is deleted.
User : Specifies the user or queue to which the lead or case will be assigned if it matches the condition. Users specified here cannot be marked “inactive” and they must have “Read” permission on leads or cases.
Do Not Reassign Owner : Specifies that the current owner on a lead or case will not be reassigned to the lead or case when it is updated.
Email Template : We can specifies the template to use for the email that is automatically sent to the new owner. If no template is specified, no email will be sent. When assigning a lead or case to a queue, the notification goes to the Queue Email address specified for the queue and all queue members.
Predefined Case Teams : Specifies the predefined case team(s) to add to a case when it matches the condition. A case team is a group of people that work together to solve cases.
Replace any existing predefined case teams on the case : Specifies that any existing predefined case teams on the case are replaced with the predefined case teams on the condition, when a case matches the condition.
After creating the entry, click Save, or Save & New to save the entry and create more entries.
Assignment Rule Example
Following is sample Case assignment rule which assigns case to different queues based on Billing Country, Account SLA and customer type:
Assignment rules in Salesforce
For more details about assignment rules please refer to assignment rules official link.
apex:repeat is an iteration component that allows you to output the contents of a collection according to a structure that you specify. The collection can include up to 1,000 items.
Note that if used within an <apex:pageBlockSection> or <apex:panelGrid> component, all content generated by a child <apex:repeat> component is placed in a single <apex:pageBlockSection> or <apex:panelGrid> cell.
This component can’t be used as a direct child of the following components:
<apex:panelBar>
<apex:selectCheckboxes>
<apex:selectList>
<apex:selectRadio>
<apex:tabPanel>
<apex:repeat> tag has following attributes
Attribute Name
Attribute Type
Description
first
Integer
The first element in the collection visibly rendered, where 0 is the index of the first element in the set of data specified by the value attribute. For example, if you did not want to display the first two elements in the set of records specified by the value attribute, set first="2".
Id
String
An identifier that allows the repeat component to be referenced by other components in the page.
rendered
Boolean
A Boolean value that specifies whether the component is rendered on the page. If not specified, this value defaults to true.
rows
Integer
The maximum number of items in the collection that are rendered. If this value is less than the number of items in the collection, the items at the end of the collection are not repeated.
value
Object
The collection of data that is iterated over.
var
String
The name of the variable that represents the current item in the iteration.
Difference between apex:pageBlockTable and apex:repeat
When we use pageBlockTable then all salesforce styles are inherited. But when we use apex:repeat we have to manually add table tr td tags and all styles. Advantage of using apex:repeat is that we have more control on display of data.
Apex runtime engine strictly enforces limits to ensure that runaway Apex code or processes don’t monopolize shared resources.
Why Salesforce has Governor Limits?
Because Apex runs in a multitenant environment, the Apex runtime engine strictly enforces limits to ensure that runaway Apex code or processes don’t monopolize shared resources. If some Apex code exceeds a limit, the associated governor issues a runtime exception that cannot be handled.
Type of Governor Limits
Per-Transaction Apex Limits
Per-Transaction Certified Managed Package Limits
Lightning Platform Apex Limits
Static Apex Limits
Size-Specific Apex Limits
Miscellaneous Apex Limit
In this post we will mainly cover Per-Transaction Apex Limits.
Per-Transaction Apex Limits
These limits count for each Apex transaction. For Batch Apex, these limits are reset for each execution of a batch of records in the execute method.
This table lists limits for synchronous Apex and asynchronous Apex (Batch Apex and future methods) when they are different. Otherwise, this table lists only one limit that applies to both synchronous and asynchronous Apex. This table can be used as cheat sheet.
Here is list of important governor limits in salesforce
Total number of SOQL queries issued: 100
Total number of SOSL queries issued : 20
Total number of DML statements issued : 150
Total number of records retrieved by SOQL queries : 50,000
Total number of records processed as a result of DML statements : 10,000
Here is full list of governor limits in salesforce
Description
Synchronous Limit
Asynchronous Limit
Total number of SOQL queries issued
100
200
Total number of records retrieved by SOQL queries
50,000
50,000
Total number of records retrieved by Database.getQueryLocator
10,000
10,000
Total number of SOSL queries issued
20
20
Total number of records retrieved by a single SOSL query
2,000
2,000
Total number of DML statements issued
150
150
Total number of records processed as a result of DML statements, Approval.process, or database.emptyRecycleBin
10,000
10,000
Total stack depth for any Apex invocation that recursively fires triggers due to insert, update, or delete statements
16
16
Total number of callouts (HTTP requests or Web services calls) in a transaction
100
100
Maximum cumulative timeout for all callouts (HTTP requests or Web services calls) in a transaction
120 seconds
120 seconds
Maximum number of methods with the future annotation allowed per Apex invocation
50
0 in batch and future contexts; 1 in queueable context
Maximum number of Apex jobs added to the queue with System.enqueueJob
50
1
Total number of sendEmail methods allowed
10
10
Total heap size
6 MB
12 MB
Maximum CPU time on the Salesforce servers
10,000 milliseconds
60,000 milliseconds
Maximum execution time for each Apex transaction
10 minutes
10 minutes
Maximum number of push notification method calls allowed per Apex transaction
10
10
Maximum number of push notifications that can be sent in each push notification method call
2,000
2,000
Maximum number of EventBus.publish calls for platform events configured to publish immediately
150
150
Per-Transaction Certified Managed Package Limits
Certified managed packages—managed packages that have passed the security review for AppExchange—get their own set of limits for most per-transaction limits. Salesforce ISV Partners develop certified managed packages, which are installed in your org from AppExchange and have unique namespaces.
There’s no limit on the number of certified namespaces that can be invoked in a single transaction. However, the number of operations that can be performed in each namespace must not exceed the per-transaction limits. There’s also a limit on the cumulative number of operations that can be made across namespaces in a transaction. This cumulative limit is 11 times the per-namespace limit. For example, if the per-namespace limit for SOQL queries is 100, a single transaction can perform up to 1,100 SOQL queries. In this case, the cumulative limit is 11 times the per-namespace limit of 100. These queries can be performed across an unlimited number of namespaces, as long as any one namespace doesn’t have more than 100 queries. The cumulative limit doesn’t affect limits that are shared across all namespaces, such as the limit on maximum CPU time.
This table lists the cumulative cross-namespace limits.
Description
Cumulative Cross-Namespace Limit
Total number of SOQL queries issued
1,100
Total number of records retrieved by Database.getQueryLocator
110,000
Total number of SOSL queries issued
220
Total number of DML statements issued
1,650
Total number of callouts (HTTP requests or web services calls) in a transaction
1,100
Total number of sendEmail methods allowed
110
Lightning Platform Apex Limits
These limits aren’t specific to an Apex transaction; Lightning Platform enforces these limits.
Description
Cumulative Cross-Namespace Limit
The maximum number of asynchronous Apex method executions (batch Apex, future methods, Queueable Apex, and scheduled Apex) per a 24-hour period
250,000 or the number of user licenses in your org multiplied by 200, whichever is greater
Number of synchronous concurrent transactions for long-running transactions that last longer than 5 seconds for each org.
10
Maximum number of Apex classes scheduled concurrently
100. In Developer Edition orgs, the limit is 5.
Maximum number of batch Apex jobs in the Apex flex queue that are in Holding status
100
Maximum number of batch Apex jobs queued or active concurrently
5
Maximum number of batch Apex job start method concurrent executions
1
Maximum number of batch jobs that can be submitted in a running test
5
Maximum number of test classes that can be queued per 24-hour period (production orgs other than Developer Edition)
The greater of 500 or 10 multiplied by the number of test classes in the org
Maximum number of test classes that can be queued per 24-hour period (sandbox and Developer Edition orgs)
The greater of 500 or 20 multiplied by the number of test classes in the org
Static Apex Limits
These Apex Limits that are applied across all transactions.
From a Developer’s perspective, it is important to ensure that our code should be scalable and should not hit the governor limits. Its very important to follow some of best practices so that our code does not hit governor limit. These are some of best practices that we should follow:
Bulkify your Code
Avoid SOQL Queries or DML statements inside FOR Loops
Bulkify your Helper Methods
Using Collections, Streamlining Queries, and Efficient For Loops
Streamlining Multiple Triggers on the Same Object
Querying Large Data Sets
Use of the Limits Apex Methods to Avoid Hitting Governor Limits
Use @future Appropriately
Use batch apex if you are working for more than 50000 records.
Never make any SOQL, DML operation inside the loop.
aura if renders the content within the tag if the isTrue attribute evaluates to true. The framework evaluates the isTrue expression and instantiates components either in its body or else attribute.
Difference between aura if and aura renderIf
aura:if instantiates the components in either its body or the else attribute, but not both. aura:renderIf instantiates both the components in its body and the else attribute, but only renders one. If the state of isTrue changes, aura:if has to first instantiate the components for the other state and then render them. We recommend using aura:if instead of aura:renderIf to improve performance.
Example of using aura if
    <aura:attribute name="variable1" type="boolean" default="true"/>
    <aura:attribute name="variable2" type="boolean" default="false"/>
    <aura:attribute name="variable3" type="boolean" default="true"/>
    <aura:attribute name="variable4" type="boolean" default="false"/>

    <!--Example of aura:if-->
    <aura:if isTrue="{!v.variable1}">
        <div style="background-color:LightBlue">
    		This should be displayed as variable1 is true
        </div>
    </aura:if>
Example of aura if with aura set else attribute
Assuming that we have same 4 attributes available.
    <!--Example of aura:if with aura:set else attribute-->
    <aura:if isTrue="{!v.variable2}">
        <div style="background-color:LightBlue">
    		This should not be displayed as variable2 is false so else part will execute.
        </div>
        <aura:set attribute="else">
            <div style="background-color:LightBlue">
        		This should be displayed as if condition is not satisfied.
            </div>
    	</aura:set>
    </aura:if>
Example of using and condition with aura:if
    <!--Example of using AND condition with aura:if-->
    <aura:if isTrue="{!and(v.variable1, v.variable2)}" >
        <div style="background-color:LightBlue">
        	and Example. As variable1 is true and variable2 is false so nothing will be displayed.
        </div>
    </aura:if>

    <aura:if isTrue="{!and(v.variable1, v.variable3)}" >
        <div style="background-color:LightBlue">
        	and Example. As variable1 is true and variable3 is true so it will be displayed.
        </div>
    </aura:if>
Example of using or condition with aura if
    <!--Example of using OR condition with aura:if-->
    <aura:if isTrue="{!or(v.variable1, v.variable2)}" >
        <div style="background-color:LightBlue">
        	or Example. As variable1 is true and variable2 is false so it will be displayed.
        </div>
    </aura:if>
    <aura:if isTrue="{!or(v.variable2, v.variable4)}" >
        <div style="background-color:LightBlue">
        	or Example. As variable2 is false and variable4 is false so it will not be displayed.
        </div>
    </aura:if>
aura if multiple conditions
   <!--aura:if with complex or and condition-->
    <aura:if  isTrue="{!or(and(v.variable1, v.variable3) , v.variable2 ) }" >
        <div style="background-color:LightBlue">
            complex or and example. It will showup as variable1 is true, variable3 is true and variable2 is false
        </div>
    </aura:if>
aura if complete component example code
<aura:component >
    <aura:attribute name="variable1" type="boolean" default="true"/>
    <aura:attribute name="variable2" type="boolean" default="false"/>
    <aura:attribute name="variable3" type="boolean" default="true"/>
    <aura:attribute name="variable4" type="boolean" default="false"/>

    <!--Example of aura:if-->
    <aura:if isTrue="{!v.variable1}">
        <div style="background-color:LightBlue">
    		This should be displayed as variable1 is true
        </div>
    </aura:if>

    <!--Example of aura:if with aura:set else attribute-->
    <aura:if isTrue="{!v.variable2}">
        <div style="background-color:LightBlue">
    		This should not be displayed as variable2 is false so else part will execute.
        </div>
        <aura:set attribute="else">
            <div style="background-color:LightBlue">
        		This should be displayed as if condition is not satisfied.
            </div>
    	</aura:set>
    </aura:if>

    <!--Example of using AND condition with aura:if-->
    <aura:if isTrue="{!and(v.variable1, v.variable2)}" >
        <div style="background-color:LightBlue">
        	and Example. As variable1 is true and variable2 is false so nothing will be displayed.
        </div>
    </aura:if>

    <aura:if isTrue="{!and(v.variable1, v.variable3)}" >
        <div style="background-color:LightBlue">
        	and Example. As variable1 is true and variable3 is true so it will be displayed.
        </div>
    </aura:if>

    <!--Example of using OR condition with aura:if-->
    <aura:if isTrue="{!or(v.variable1, v.variable2)}" >
        <div style="background-color:LightBlue">
        	or Example. As variable1 is true and variable2 is false so it will be displayed.
        </div>
    </aura:if>
    <aura:if isTrue="{!or(v.variable2, v.variable4)}" >
        <div style="background-color:LightBlue">
        	or Example. As variable2 is false and variable4 is false so it will not be displayed.
        </div>
    </aura:if>

    <!--aura:if with complex or and condition-->
    <aura:if  isTrue="{!or(and(v.variable1, v.variable3) , v.variable2 ) }" >
        <div style="background-color:LightBlue">
            complex or and example. It will showup as variable1 is true, variable3 is true and variable2 is false
        </div>
    </aura:if>

</aura:component>
Many time we have requirement to generate random number in Apex. It can be achieved using Math.random() function. This method return a positive Double that is greater than or equal to 0.0 and less than 1.0.
This method only returns number between 0.0 and 1.0. Now its important how we can use this method to generate different variation of random number that we need based on our requirements. Lets see some examples of getting random number.
We use cookies to ensure that we give you the best experience on our website. If you continue to use this site we will assume that you are happy with it. AcceptRead More
Privacy & Cookies Policy
Privacy Overview
This website uses cookies to improve your experience while you navigate through the website. Out of these, the cookies that are categorized as necessary are stored on your browser as they are essential for the working of basic functionalities of the website. We also use third-party cookies that help us analyze and understand how you use this website. These cookies will be stored in your browser only with your consent. You also have the option to opt-out of these cookies. But opting out of some of these cookies may affect your browsing experience.
Necessary cookies are absolutely essential for the website to function properly. This category only includes cookies that ensures basic functionalities and security features of the website. These cookies do not store any personal information.
Any cookies that may not be particularly necessary for the website to function and is used specifically to collect user personal data via analytics, ads, other embedded contents are termed as non-necessary cookies. It is mandatory to procure user consent prior to running these cookies on your website.


Happy Coding:)