
Data is the backbone of any business! The primary motif of data backup and recovery is to create a copy of the data to recover from a primary data failure. In addition, primary data failure can lead to hardware and software failure. Sometimes, to mitigate data corruption risks and malicious attacks, Salesforce data backup and recovery is one option. On the other hand, data copies allow organizations to restore potential data and business recovery.
In fact, data storing is a critical choice to protect against primary data loss. Backup copies are created on a consistent pattern to minimize data lost between the backup processes. Moreover, with time and process, backup recovery can be daunting! While retaining multiple copies offers better flexibility, they are also the threat of data protection will still be there!
If you are not aware of the potential threat of data backup and recovery, this blog is definitely for you! We will discuss why do you need a 3rd party Salesforce data backup and recovery tool?
Why is data backup crucial for your business?
Large enterprises are clearly treasure troves of data! Hackers always target data-rich enterprises. However, data security is not only about protecting your business from malicious outsiders. It is also a way to take major steps against disaster management. Salesforce data recovery system allows managing and protecting potential business data.
- Everything we do for our business has a real existence. Data plays a critical role in enhancing business value. Organizations without data privacy face huge penalties for non-compliance. In fact, they also establish a valuable relationship by not complying with security protection.
- Organizations should implement strong security support to protect personal data and prevent data breaches that hurt businesses. Data security and backup also prevent breaches that hurt subjective data and individual data.
- On the other hand, database backup helps to restore potential data during any disaster recovery period. It also helps to restore data that have undergone damage and deletion. Hence, they are essential to protect against data loss and to disrupt business operations.
Challenges with Salesforce data
Nowadays, businesses use multiple applications to handle sales, finances, management, and services. In fact, it is crucial to improve operational efficiency. Salesforce data backup and recovery poses many challenges for small to big organizations. Take a quick glance at the challenges companies witness during integrating Salesforce data backup models:
Data mapping
It is the most common issue encountered during the data backup process. For data and field mismatch, the integration process turns out complicated and critical. Hence, it is crucial to ensure mapping the right field of data and target app-supported fields. Salesforce often fails to recognize the character of data, and the data mapping process becomes lengthy and time-consuming.
Duplicate records
It is imperative to install a universal system to identify the limitation of duplicate data during the integration process. Using data import wizards and oracle financial system, the process can be easier than ever. However, the duplicate records often confuse the users to track the real database.
Data migration
Data migration is one of the crucial aspects of the Salesforce data recovery edition. The duplicate records of data and transferring the records might be irrelevant. In that case, the users need to enable duplicate management features to define the custom code. Moreover, by defining the field-level security, salesforce can initiate data migration.
Auto-ID creation
The Salesforce data backup system is efficient at generating automated IDs for each data entity. The software enables overriding prevention within the data channels with customer validation and logic. However, countless IDs make the process more complicated for the users to separate the original source.
Real-time integration
Real-time integration is a tough nut to crack. Generally, it exports data in batches and may not be immediately synced with real-time integration.
Bad data promotion
Propagating malicious data into the Salesforce data backup model is not a good practice. If the external system pushes out the limits and unnecessary information, it is prone to develop duplicate data. Hence, it is important to check the cleanup system to leverage the data backup process.
Data protection is easier with 3rd Party Salesforce data backup and recovery tools
There are always other better options available to backup and recover the data, and these are third-party options for Salesforce data backup and recovery. With third-part tools like Archive on Cloud (AoC), you can easily eradicate the limitations and challenges of data management and recovery.
Benefits of Third-Party Tools
- 3rd party tools are designed to overcome the limitations of Salesforce data backup and recovery
- Manual and weekly Salesforce exports are not enough to protect your data against situations.
- It’s hard to recover permanently lost data from Salesforce and recovery beyond your scope is costly.
- Versioning has limitations on type and number of records.
The above reasons make it very clear that relying completely on Salesforce data backup and recovery is not enough.
In fact, data backup is now easier with Archive on Cloud as it saves your data in database or the easy access and usage. There are also other third-party tools but here is what AoC has to offer more?
Eliminates manual backup process
Gone are days of the long backup management process. With AoC, users can simply use automatic backup and schedule their backup choice to protect all potential data.
Data Compliant
AoC allows simplified compliance with all the required standards. In addition, it offers the utmost security.
Robust data protection
AoC’s data backup system allows businesses to start protecting their data from day one with the help of automatic backup and on-demand backup schedule. Even if users are not well-equipped with backup process, they will face no issues, as the interface is easy to use, and the process is simplified enough that things happen over clicks.
Simple data recovery
AoC also allows a simple data recovery model which can be access through clicks. It is very easy to send data back to your Salesforce Org as and when required. The system is designed for every user, including the non-tech-savvy users who effortlessly manage the entire process.
Versioning of data
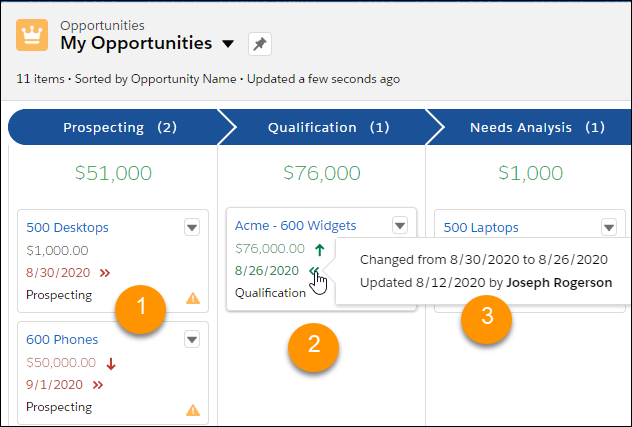
It’s not easy to remember the last change you made to the data and finding it through exported file isn’t easy either. AoC allows saving the versioning data of records for future reference. This feature is to keep your complete data safe and backed up so you never are in a bad situation.
No Surprises
AoC leaves no surprises by enabling you to create customized alerts and identify data anomalies within a protected environment.
How does AoC work for data recovery?
While the Salesforce data recovery system still has some limitations, with AoC, businesses can eliminate them. From storage capacity to general legacy backup management, the Salesforce data backup and recovery poses many challenges for a large amount of data. However, AoC helps your existing data with better protection ability and efficiency.
- In general, Salesforce schedules an automated data backup system in excel format with restricted storage capacity. In case the users add more data to the system, it cannot automate the process. AoC enables an automated data backup system whenever new data is found in the system. Also offers option to schedule backup as per the need.
- AoC eliminates the hassle of manual recovery. If you have backed up your data in MySQL database, the tool over clicks takes your data back to Salesforce. Also, the users can restore the data at their convenience.
- History tracking is more efficient with AoC. While Salesforce can only track limited records history at a time, you can track the updated version of any number of records from the versioning data.
- Recovering data from recycle bin is possible only for 15 days in Salesforce. However, AoC keeps track of data in a specific format and recovers any data version from the backup.
Final thought
Data backup is not a choice anymore! However, before considering any third-party Salesforce data backup services, it is crucial to be aware of the challenges. Moreover, businesses should take the opportunity to leverage their platforms and boost performance with smart data backup solutions like AoC. Moreover, AoC promises automatic backup, quick data recovery from the backup history, and versioning of data. So, the benefits of smart Salesforce data backup and recovery are limitless! To start protecting your Salesforce data, get a free demo of AoC today!In the dynamic world of online betting, 1xbet stands out as a trusted name that offers an immersive gaming and betting experience. With the launch of the 1xbet App Download, users are now equipped to place wagers, monitor live scores, and even view real-time matches, all from the comfort of their devices. This innovative approach not only simplifies betting procedures but also enhances user engagement, making every game an exciting adventure.
 (3) next to an action’s name indicates that visibility rules are applied. If you migrated actions from a page layout, you can modify them in the Actions modal.
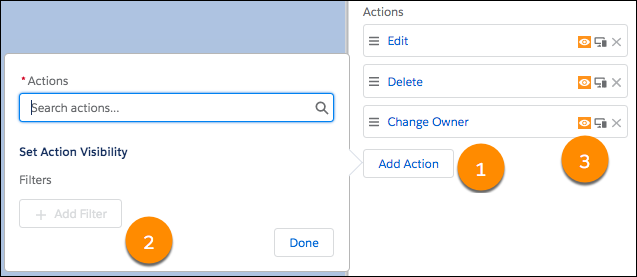


Recent Comments