Salesforce Spring ’20 Release Notes

Salesforce Spring ’20 Release Notes

All you need to know about Salesforce Spring ’20 Release Notes

Salesforce Spring ’20 Release Notes: As we come towards the end of the year and already excited for the new Year. Here comes the summary of some cool and important features for admins and developers in Salesforce Spring ’20 Release.

Spring 20

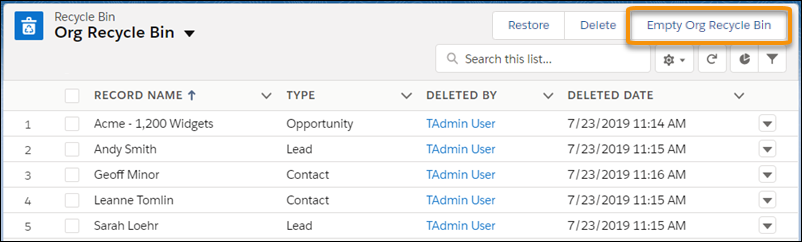
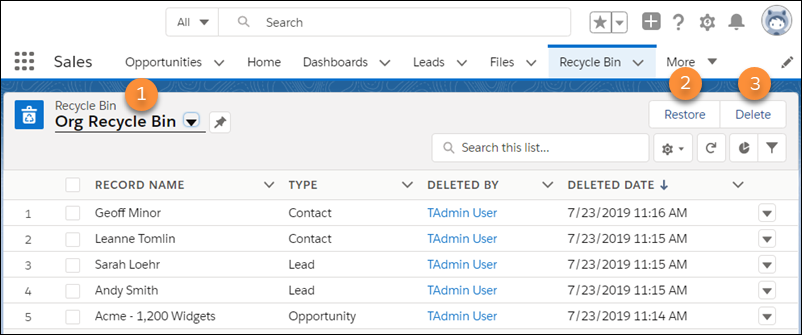
Empty the Recycle Bin in One Step

Empty your Salesforce org’s Recycle Bin in Lightning Experience with a single click. Previously, you either selected individual items to delete or had to switch to Salesforce Classic to permanently delete all items at once.

Salesforce Spring 20 Empty Recycle bin

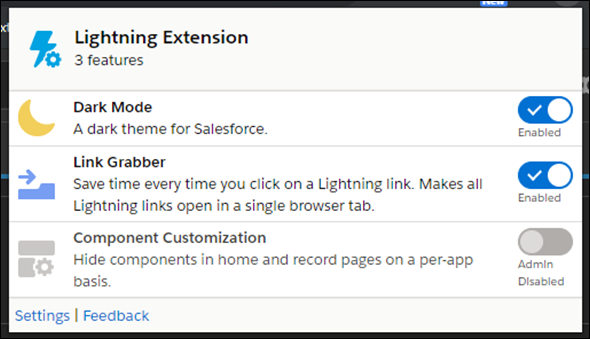
New Lightning Experience Features with the Lightning Extension for Chrome (Generally Available)

Are you an early adopter of the latest and greatest technology, or do you want to become one? With the Lightning Extension, now generally available, you can gain access to the latest Lightning Experience features and try them before everyone else.

Setup:  Download the Lightning Extension for your browser. From the Lightning Extension features panel, choose which features to turn on.

Salesforce Spring 20 Lightning Chrome Extensions

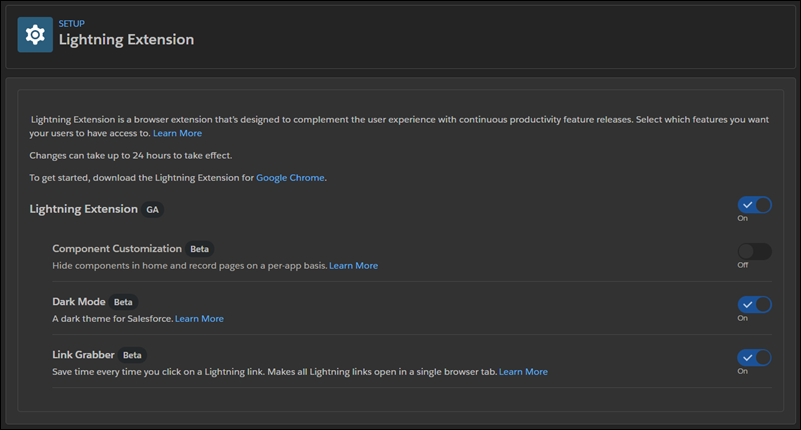
To control which features are available to your users, from Setup, in the Quick Find box, enter Lightning Extension, and then select Lightning Extension. From there, you can activate individual features or disable the extension as a whole. Changes can take up to 24 hours to take effect.

Salesforce Spring 20 Lightning Chrome Extensions

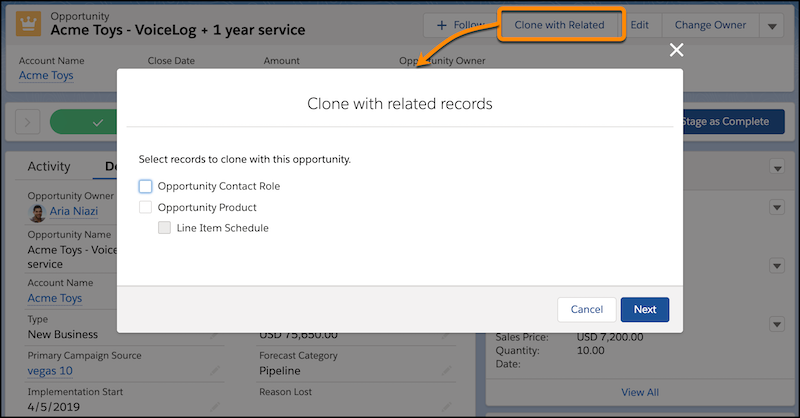
Clone Objects Along with Their Related Records

The Clone with Related action makes it simple to handle a variety of repeating business processes. When you click Clone with Related, all of the original object’s related records are also added to the cloned object.

Setup: In the Object Manager, find one of the supported objects and select Page Layout. Add the Clone with Related action to the layout, and save. In the dialog, the order of the options can’t be changed.

Salesforce Spring 20 Clone with Related Records

Navigate to a Record’s Create Page with Default Field Values

Use the new lightning/pageReferenceUtils module or lightning:pageReferenceUtils Aura component to build navigation links in your components that prepopulate a record’s create page with default field values. Prepopulated values can accelerate data entry, improve data consistency, and otherwise make the process of creating a record easier.

Create custom buttons and links that pass default field values to a new record.

Admin can configure this feature which allows users to create a new record with prepopulated values.

To construct a custom button or link that launches a new record with prepopulated field values, use this sample formula:

/lightning/o/Account/new?defaultFieldValues=
    Name={!URLENCODE(Account.Name)},
    OwnerId={!Account.OwnerId},
    AccountNumber={!Account.AccountNumber},
    NumberOfEmployees=35000,
    CustomCheckbox__c={!IF(Account.SomeCheckbox__c, true, false)}

Aura Components in the ui Namespace Are Deprecated

Salesforce plans to end support for the deprecated components on May 1, 2021.

To Solve this issue: Replace the deprecated components with their counterparts in the lightning namespace. These components are faster, more efficient, and they implement Lightning Design System styling out-of-the-box.

Please refer to the release notes on the details of the deprecated Aura components and their recommended alternatives.

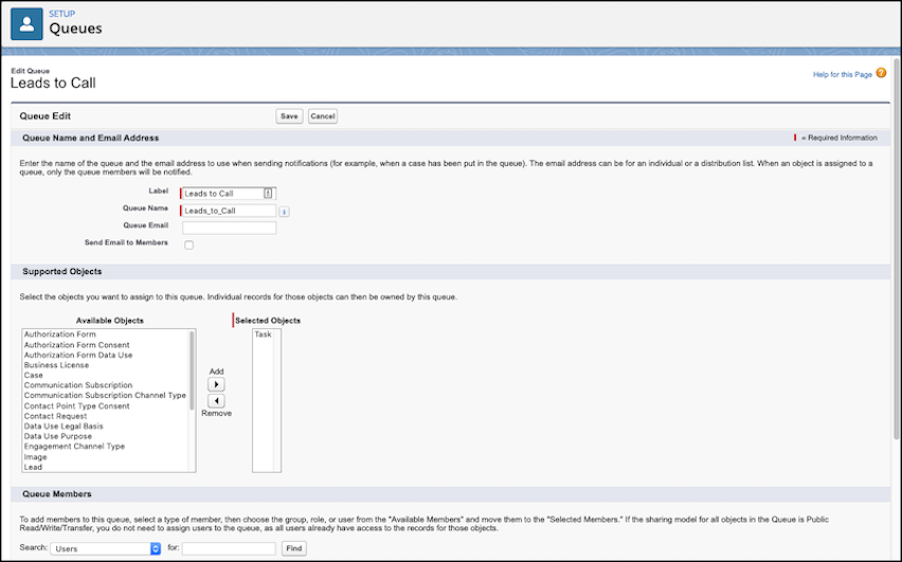
Assign Tasks to a Queue

Yes, you heard it right! Now you can assign tasks with the shared queues.

When reps assign tasks to a queue, those tasks are available to members of the queue, which means everyone can pitch in to help. No more relying on one sales rep to do it all. Now others on the team can lend a hand without waiting for work to be delegated or reassigned

Salesforce Spring 20 New Task

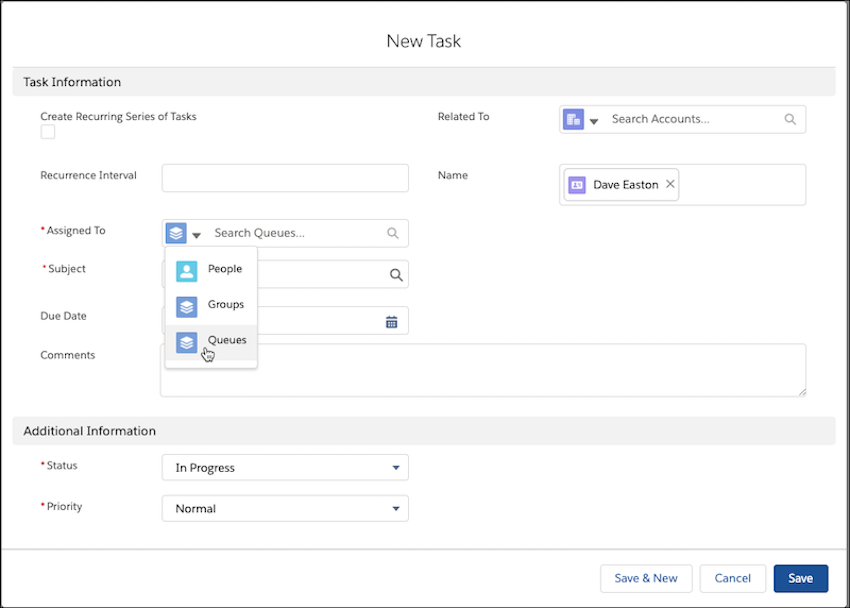
Setup: In Setup, enter Queues in the Quick Find box and then select Queues. From the Queues setup page, select New. Then, create a queue and assign Tasks as the supported object.

Tasks Setup Spring 20

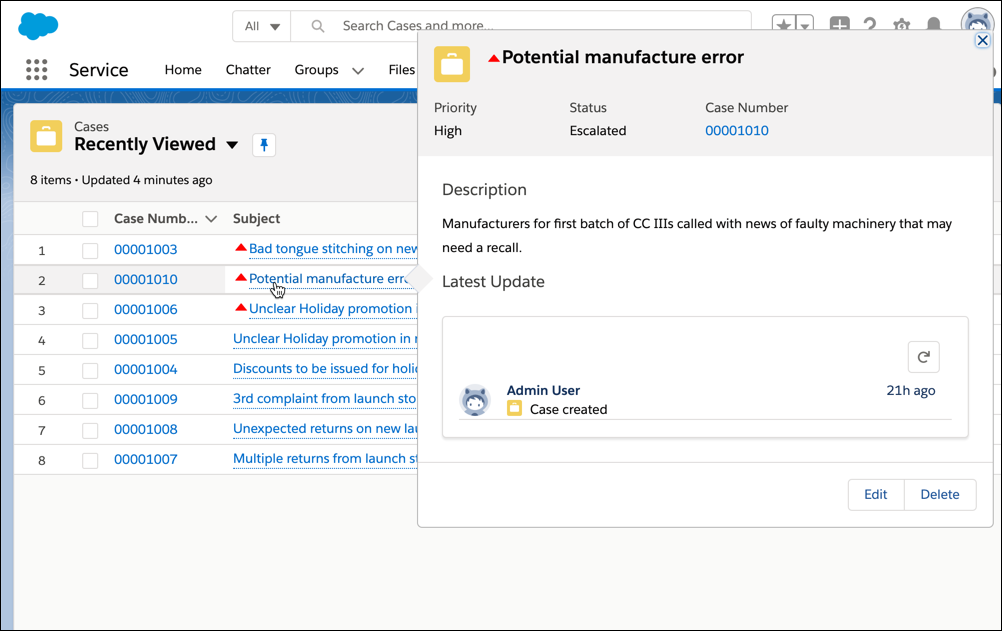
View and Edit Case Details from the List View with Case Hover in Lightning Experience

Agents can save time by previewing, editing, and deleting cases directly from the list view with a compact preview that appears when they hover on the case subject.

Setup: Hover over the Subject line to see a preview of the case and to quickly edit or delete the case.

Salesforce Spring 20 Edit Case with hover

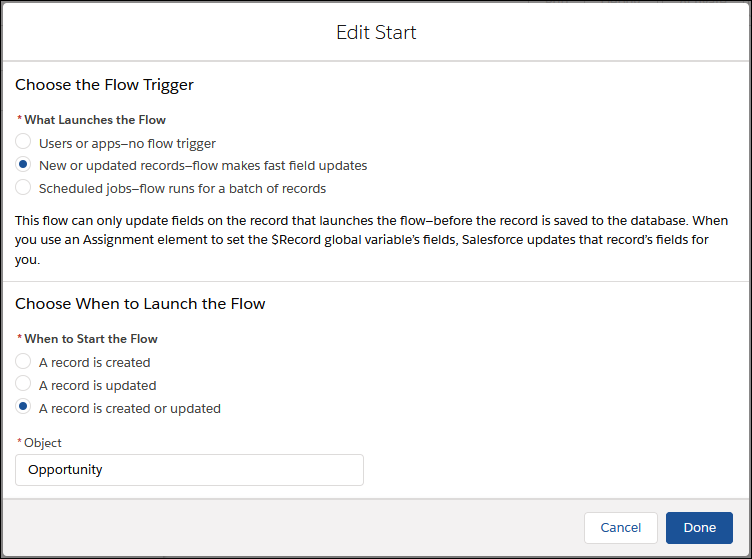
Update New and Changed Records 10 Times Faster by Using Before-Save Updates in Flows

Creating or updating a record can now trigger an auto launched flow to make additional updates to that record before it’s saved to the database. Before-save updates inflows are much faster than other available record-triggered updates. For example, a before-save update in a flow is 10 times faster than an update in a record-change process that’s built-in Process Builder. Replace your record-change processes with flows to minimize how often the spinner appears when users save records.

Setup: Create an auto launched flow and open the Start element. For What Launches the Flow, select New or updated records—flow makes fast field updates.

Salesforce Spring 20 Flows

No Maximum Daily Cap for API Calls

I am sure all developers got excited about this change. Finally, the maximum daily cap of 1,000,000 API requests has been removed. 

Why: This change allows you to make more API calls without exceeding your allocation.

Create a Filtered List of Records Using New Time-Related Conditions (Beta)

You now have more ways to filter a list of records using time-related conditions in a conversational search. To get the most relevant search results, enter a conversational search using the words modified, created, viewed, or closed followed by a relative time period. For example, enter “cases closed this year,” to see a list of cases from the current year with closed status.

Salesforce Spring 20 Time Filters

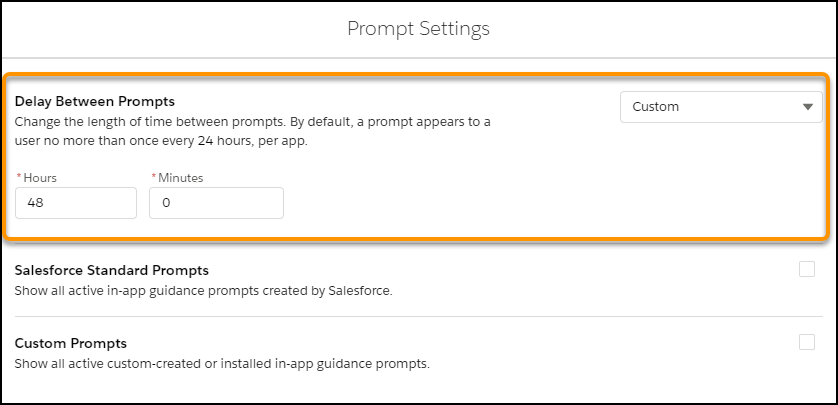
Customize When Prompts Appear to Users

Quickly change the amount of time to delay prompts. Decrease the global delay time to accelerate onboarding prompts or increase the delay to spread out announcements and updates. Ignore the global delay time to show a prompt when a page first loads or to show multiple prompts a day without changing the global delay time for all prompts.

From Setup in Lightning Experience, enter In-App Guidance in the Quick Find box, and then select In-App Guidance.

Click Prompt Settings and change the hours and minutes under Delay Between Prompts. Specify up to 99 hours and up to 59 minutes. By default, a prompt appears to a user no more than once every 24 hours, per app.

Salesforce Spring 20 Prompt Settings

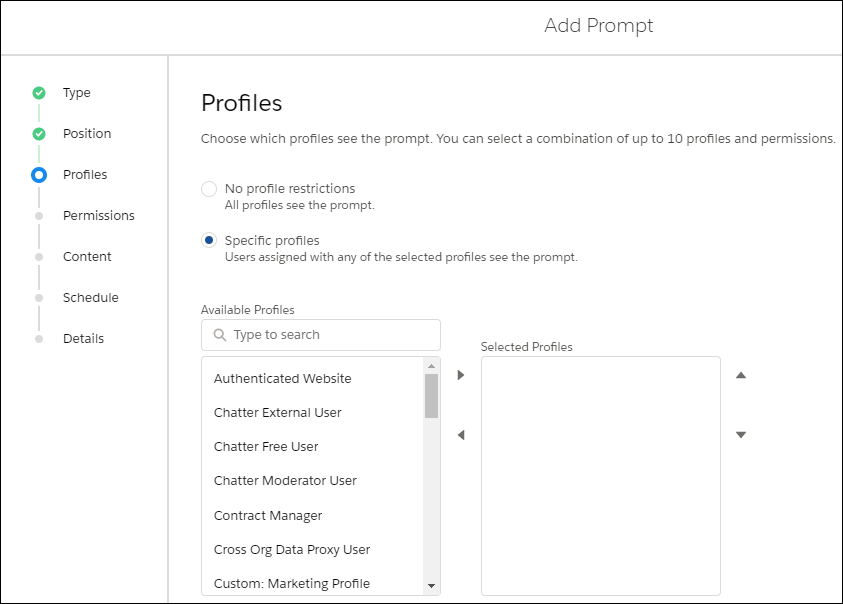
Specify Profiles When Creating Prompts

Fine-tune your prompt’s message for a specific audience, what objects and data they have access to, or what they can do. Previously, you could only use permissions to display prompts to specific users. Starting in Spring ’20, use standard and custom profiles too.

Setup: From Setup in Lightning Experience, enter In-App Guidance in the Quick Find box, and then select In-App Guidance.

If you select multiple profiles, the prompt appears to any of the profiles specified. You can select a combination of up to 10 profiles and permissions for each prompt. If you select multiple items, the prompt appears to users who have all the permissions specified and any of the profiles specified.

Salesforce Spring 20 Prompt Permission

Manage All Lightning Experience Configuration Converter Tabs from One Place (Beta)

The new Home tab is your home base for the transition tool. Tiles summarize the status of each tab in the Lightning Experience Configuration Converter. Kick off scans of individual tabs, and find out what’s left to do.

Why: Easily track your progress as you reduce the number of necessary fixes and change each tab’s status icon to green.

Salesforce Spring 20 Configuration converter tab

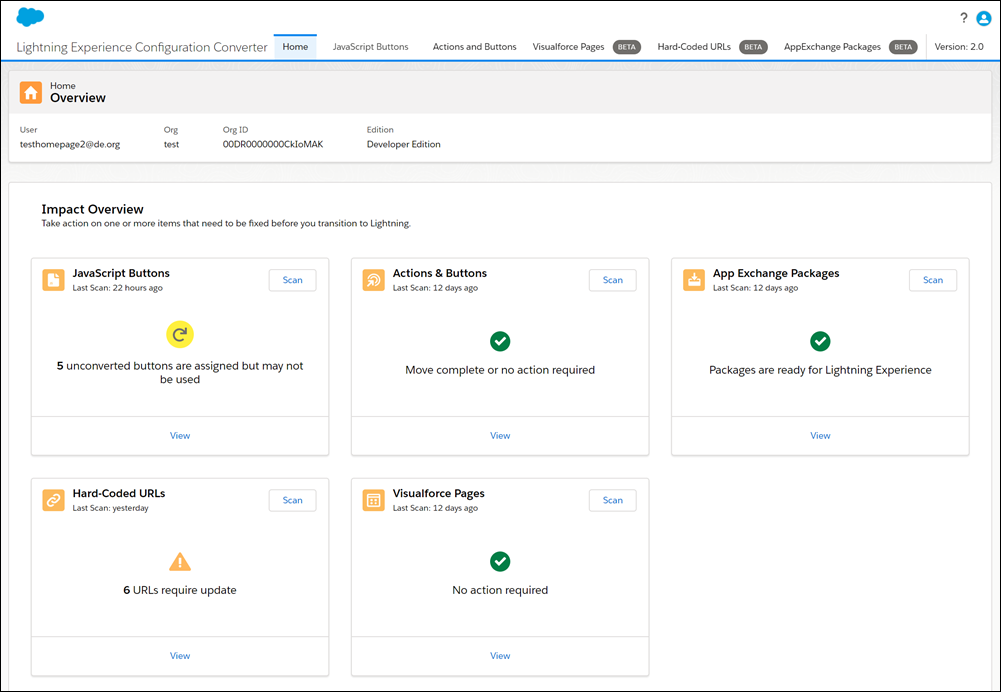
The Lightning Experience Configuration Converter is a standalone tool that lives outside of Salesforce. We recommend that you run it in a sandbox or Developer Edition org first, and then migrate your changes to your production org.

Note – As a beta feature, the Home tab in the Lightning Experience Configuration Converter is a preview and isn’t part of the “Services” under your master subscription agreement with Salesforce.

Attach Formatted Spreadsheets to Report Subscriptions (Beta)

When people subscribe to a report, a new option lets them choose to receive results as a formatted spreadsheet attached to the subscription email. The email itself includes high-level report details, such as report name and time run, plus a link back to the full report in Salesforce. It does not include row-level record details, which are included in the spreadsheet instead.

Setup: Subscribe to a report, select Attach results as a formatted spreadsheet file, and click Save.

Reports Subscribe Salesforce Spring 20

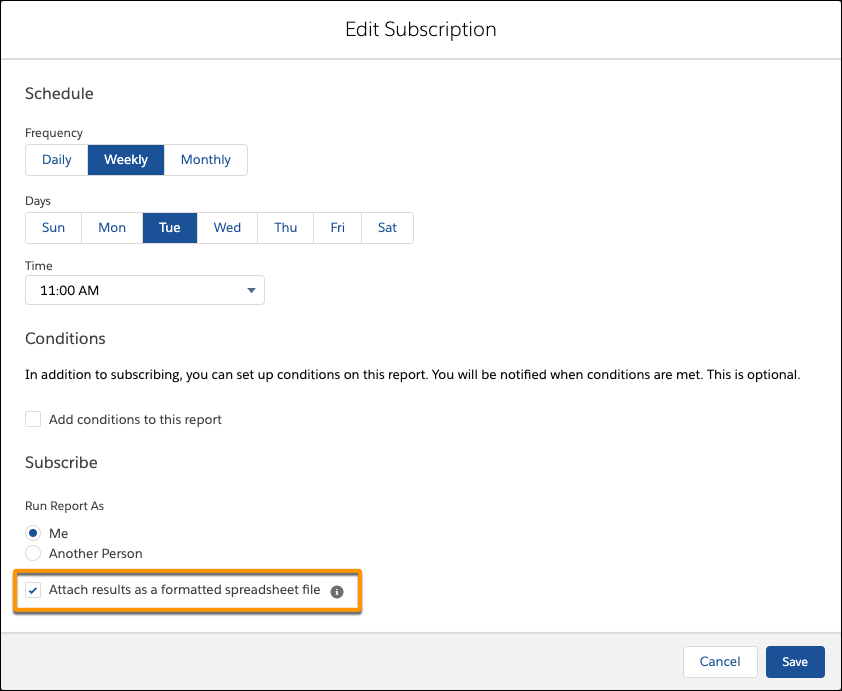
Note – As a beta feature, Formatted Spreadsheet Attachments is a preview and isn’t part of the “Services” under your master subscription agreement with Salesforce.

Increase Productivity with Local Development for Lightning Web Components (Beta)

Lightning Web Components now offers Local Development so that you can build component modules and view your changes live without publishing your components to an org. Our new Salesforce CLI plugin lwc-dev-server configures and runs a Lightning Web Components-enabled server on your computer. You can access the local development server from the command line and the Lightning Web Components Extension for VS Code.

Setup: To install the local development server, make sure that you have the Salesforce CLI installed, a Developer Hub-enabled org, and the most recent stable version of Chrome, Firefox, Safari, or Edge web browser.

For more details on the syntax, please visit release notes

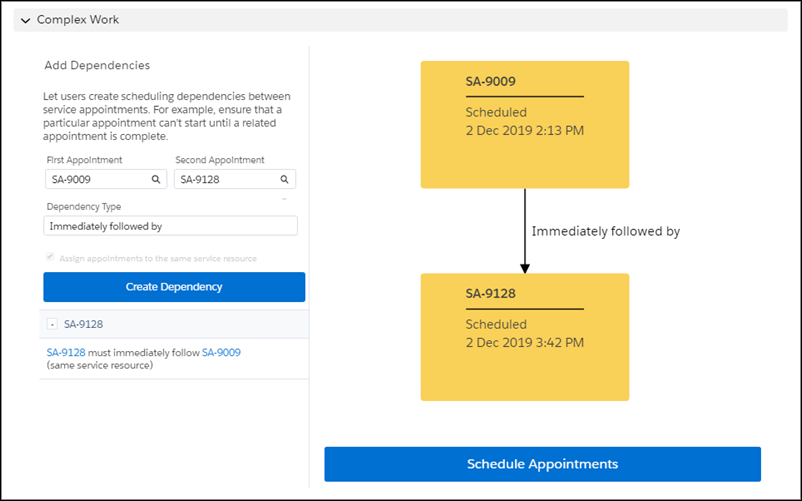
Schedule an Appointment That Immediately Follows Another (Beta)

When you want service appointments to occur back-to-back, create an Immediately Followed By dependency between them.

Setup: Enable the complex work setting, and customize the service appointment page layout to show scheduling dependencies. Then, on an appointment page, specify related appointments and select the dependency type. For Immediately Followed By dependencies, scheduling assigns the appointments back-to-back on the same day and to the same resource. Enhanced Optimization respects Immediately Followed By dependencies.

Appointment follow up Spring Salesforce

Help Your Chat Agents Respond Faster with Einstein Reply Recommendations (Pilot)

Einstein Reply Recommendations analyzes data from chat transcripts to create chat replies that address your customers’ inquiries. Agents select the most relevant chat reply from a list in the Lightning Service Console as they communicate with customers.

Einstein Reply

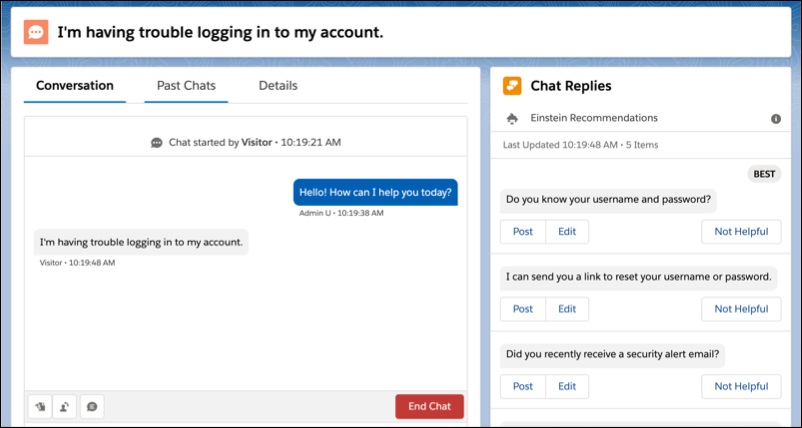
For information on enabling this feature, contact Salesforce.

Attach Actions to Asynchronous Apex Jobs Using Transaction Finalizers (Pilot)

With Spring ’20, we introduce a way to attach actions to queueable, asynchronous jobs using a new System.Finalizer interface. A specific use case is to design recovery action when a queueable job fails.

Setup: First, implement a class that implements the System.Finalizer interface. Then, attach a finalizer within a queueable job’s execute method by invoking the System.attachFinalizer method with an argument of the instantiated class that implements the finalizer interface. Only one finalizer can be attached to any queueable job. You can enqueue a single asynchronous Apex job (queueable, future, or batch) in your finalizer. You can also make callouts in the finalizer.

Please refer to release notes for an example.

Access Reports and Dashboards in the Recycle Bin

Manage your deleted reports and dashboards in the Recycle Bin for Lightning Experience. Now you can view, restore, and permanently delete your reports and dashboards without switching to Salesforce Classic.

For all the features for Spring 20 Release Notes, please refer to the Salesforce website.

Salesforce Spring 20 Release Date

Salesforce Spring ’20 Release will be globally available on February 17, 2020.

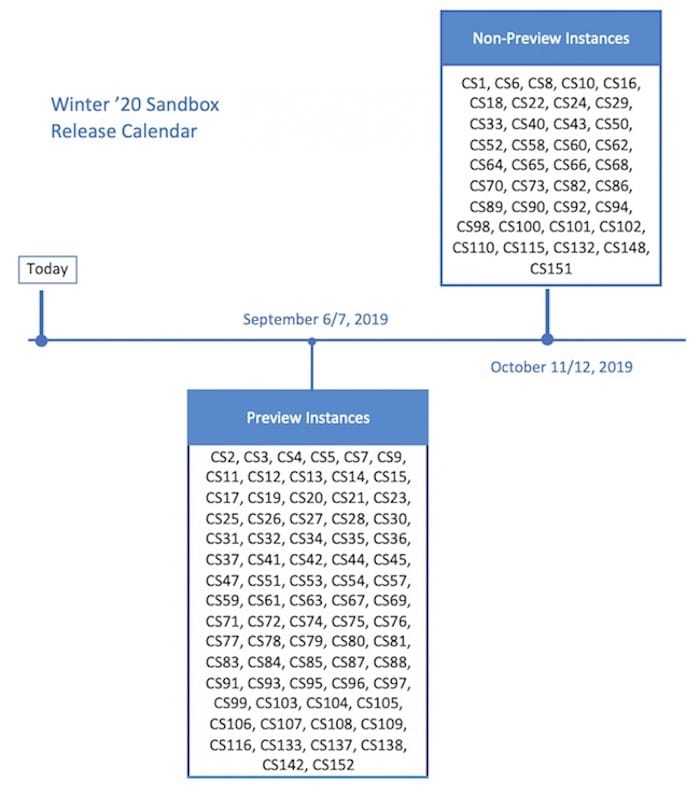
Salesforce Spring ’20 Release Date Schedule Calendar

For the Spring ‘20 Release, the preview instances will be upgraded to Spring ‘20 on January 3 and January 4, 2020, and non-preview instances will be upgraded to Spring ‘20 on February 14 and February 15, 2020.

Spring 20 Calendar

For more details on the release calendar, please visit salesforce website.

Merry Christmas

Enjoy your holidays !!!  Happy Salesforce Learning 🙂


Permanent link to this article: https://www.sfdcpoint.com/salesforce/salesforce-spring-20-release-notes/

Salesforce Winter ’20 Release Notes

Salesforce Winter ’20 Release Notes

All you need to know about Salesforce Winter ’20 Release Notes

We understand that it is difficult and a bit time-consuming to go through the entire release so here we offer to help you learn and grow in the salesforce world by presenting the summary and my most favorite feature of Salesforce Winter’ 20 Release Notes.

Salesforce Winter ’20 Release Notes

Top Features in Salesforce Winter ’20 Release Notes

Turning on Lightning Experience for all users

The Lightning Experience will be activated for all orgs from Winter ’20. Once you enable the Lightning Experience, it’s there for good. After enabling it in the Lightning Transition Assistant, you will not be able to disable it. However, you can still switch between Lightning and Classic. But we strongly recommend you keep using lightning because it is the future of CRM.

Lightning for Users

Launch into Lightning Experience Apps with the Mobile App Launcher:

The App Launcher has landed on mobile. You can switch between all your favorite Lightning apps, just like in Lightning Experience desktop.

Accessing Recycle Bin in a Lightning experience

The Recycle Bin in Lightning Experience works the same as it does in Salesforce Classic, except for a few differences. In Lightning Experience:

  • The org’s Recycle Bin is called Org Recycle Bin (1). The Salesforce Classic name is All Recycle Bin.
  • Restore records by clicking Restore (2) instead of Undelete in Salesforce Classic.
  • Permanently delete records by selecting them and clicking Delete (3) versus Undelete or Empty in Salesforce Classic.
  • You can’t view or restore reports and dashboards. Switch to Salesforce Classic to access them in the Recycle Bin.

Recycle bin salesforce lightning

Schedule Flows

 To start a flow for a set of records, select the filter conditions in the Start element. When your flow starts, a flow interview runs for each record that matches your filter—no looping required. The matching record is stored in the $Record global variable, so you can reference the variable or its fields throughout your flow.

Schedule Jobs

Add a Signature to Email Templates

With the new {{{Sender.Signature}}} merge field, email template creators can include a sender’s existing signature in an email template. The field is available wherever the merge field picker exists, including in emails, list emails, and enhanced letterheads.

Setup:

  • Users set up their signature in My Email Settings.
  • In the merge picker, the {{{Sender.Signature}}} merge field is listed as Email Signature.

Opportunity Contact Roles

Opportunity contact role customization options give you the flexibility to track and attribute revenue to roles, titles, and individuals. With custom fields and page layouts, validation rules, and Apex triggers, you can design an Opportunity Contact Role to match your specific sales and reporting processes. You can capture new data, such as titles and roles, to help your sales reps be more efficient in targeting the right contacts.
For example, a nonprofit organization can create a custom opportunity contact role called “personal donor” that allows it to track donations directly from individual donors. The organization can then identify its best donors and set up triggers to send thank you emails or other communications based on donation amounts or contact changes.
  1. See the impact on revenues and opportunity close rates from specific roles
  2. Help you target contacts for campaign-based marketing
  3. With the new data you capture, such as revenue, product interest, and scoring data

Opportunity contact Role Salesforce

Automate Account Team Creation with Process Builder

Configure a process action to add team members to an account. You can also configure a process to run when an account team member record is created or edited.

Setup: If account teams are enabled in your org, the Account Team Member object is available when you set up the process trigger.

Account Team Member Salesforce Process Builder

Use Flow Builder to Send Custom Notifications:

You can use Flow Builder to send customized notifications when important events occur. Previously, custom notification actions were fully supported only in Process Builder.

In Setup, search for Notification Builder and create a Custom Notification Type.

Then add the Send Custom Notification action to an action in Flow Builder, and select your Notification Type ID.

Set File Sharing to Inherit Record Settings:

When attaching files to records, you can have the files inherit the sharing settings of those records. For instance, when a user can edit a record, you want them to be able to edit the files on that record, too. Now you can set the default sharing permissions on files that are attached to records. The preference lets files follow the sharing settings of the record.

Setup : For new orgs, this preference is auto-enabled, and files on records are set to Set by Record by default. For existing orgs, go to Setup and enter Files in the Quick Find box. Under Salesforce Files, choose General Settings. Enable the preference Set file access to Set by Record for files attached to records.

Lightning Web Components is now Open Source

The Lightning Web Components framework is now open source, empowering you to explore the source code, customize the framework to your needs, and build enterprise-ready web components on any platform, not just Salesforce.

Setup: To develop off-platform Lightning web components, see lwc.dev. To contribute to the open-source code, see the Lightning Web Components GitHub repository.

Add Lightning Web Components as Custom Tabs.

Make a Lightning web component available as a custom tab in a Lightning Experience app and in the Salesforce app.

Setup:

  1. Add the lightning__Tab target to the component’s configuration file. The <component>.js-meta.xml configuration file defines the metadata values for the component, including the setting to allow usage in a custom tab.
    <?xml version="1.0" encoding="UTF-8"?>
    <LightningComponentBundle xmlns="http://soap.sforce.com/2006/04/metadata">
        <targets>
            <target>lightning__Tab</target>
        </targets>
    </LightningComponentBundle>
  2. Create a custom tab for this component.
  3. To display the component in a custom tab:
    • For a Lightning Experience app, add the component to the App Launcher.
    • For the Salesforce mobile app, add the component to the Salesforce app navigation menu.

Control Who Gets Read Access to Custom Metadata Types

Use profiles and permission sets to assign read access to users for custom metadata types. As of Spring ’19, you can block all API read access to custom metadata types for users who don’t have Customize Application permission. Now you can grant API read access to specific metadata types for users and user profiles, even if they don’t have the Customize Application permission.

Setup:

To grant a specific profile or permission set read access to a custom metadata type, go to the Custom Metadata Types permissions.

Custom metadata

Filter Reports Using Field Comparisons with Field-To-Field Filters (Beta):

Wow!!!  I am sure lot of people were waiting for this and now the wait is over.

Filter a report by comparing the values of two different report fields. For example, see which cases were modified after the closing date by filtering on cases with a last modified date after the closed date.

In Setup, in Reports and Dashboards Settings, select Enable Field-to-Field Filtering in Reports (Lightning Experience Only) and click Save.

Add a field filter, and change Value to Field in the filter dialog. In this example, a field-to-field filter (1) returns opportunities worth less than projected (2).

Reports salesforce

Salesforce Winter ’20 Release Dates

The Winter ’20 release will be globally available on October 14, 2019.

Salesforce Winter ’20 Schedule Calendar

Salesforce Winter ’20 Calender

For more details, please visit salesforce website

Permanent link to this article: https://www.sfdcpoint.com/salesforce/salesforce-winter-20-release-notes/

Approval Process In Salesforce

Approval Process in Salesforce

What is Approval Process in Salesforce?

Approval Process in Salesforce is an automated process that automates how Salesforce records are approved in your org. Approval Process in Salesforce is a combination of steps for a record to be approved/rejected either by a user, queue or public groups. An approval process also specifies the actions to take when a record is approved, rejected, recalled, or first submitted for approval.

For example, when an employee creates a time-off request, have Salesforce automatically sends an approval request to the employee’s manager.

Salesforce Approval Process

Here is list of steps for approval process in salesforce :

  • Setup -> Create -> Workflow and Approval -> Approval Process
  • Select object for approval process to be written
  • Click on Create New Approval Process
  • Select Standard Setup Wizard from drop down
  • Enter the Process name, Unique Name and description for your process
  • Specify Entry criteria

Approval Process Example

Here is list of sections to be configured in salesforce approval process:

  • Process Definition Detail – Approval Process Header level details like name, email template etc.
  • Initial Submission Actions – It will be executed when the user clicks on ‘Submit for Approval’ on the object record.
  • Approval Steps – Details of Steps criteria and the approvers
  • Final Approval Actions – It will be executed after all the approval process steps have been approved.
  • Final Rejection Actions – It will be executed if one of the approval process steps have been rejected.
  • Recall Actions – It will be executed if one of the approval process steps have been recalled.


Build Approval Process

Let’s build an approval process where the sales manager approves opportunities where the total opportunity amount exceeds 500K. The opportunity should reflect its approval status: Approved or Not Approved.

Planning

Make sure you preplan before you start configuring the Approval process in salesforce because this will help you design the approval process in the most optimized ways. Preplanning includes of:

  • creation of required fields
  • Identify the object for the Approval process
  • Email Template
  • Final Approval Actions like unlock record or change the status of the record

In this example, we would need below:

In Order to…We Need…
Track each opportunity’s approval statusCustom field (Opportunity)
Request approval from managers when an opportunity total Amount is more than 500KApproval process (Opportunity)
Notify managers when an opportunity amount needs approvalEmail template
When managers respond, update the opportunity’s approval statusApproval actions (Field Update)

Create Approval Process

  1. Login to Salesforce however you can ignore this step if already logged in.
  2. Navigate to Setup and search for ‘Approval process’ in Quick find or navigate to ‘Create’->Workflow & Approvals -> Approval Process
  3. For Manage Approval Processes For, select OpportunityCreate Approval process Salesforce 
  4. Click Create New Approval Process | Use Jump Start Wizard.
    The Jump Start Wizard helps you create a simple approval process by making some decisions for you.
  5. Configure the approval process.Salesforce Approval Process
    FieldValue
    NameApprove Opportunity Amount
    Approval Assignment Email TemplateApprove Opportunity Amount
    Specify Entry CriteriaOpportunity: Opportunity Amount greater than 500K
    Select ApproverLet the submitter choose the approver manually
  6.  Save the approval process.
  7. Click View Approval Process Detail Page.
  8. Under Final Approval Actions, click Add New | Field Update, and configure it with these values.Salesforce Approval Process Field Update
    FieldValue
    NameApproved
    Field to UpdateApproval  Status
    A Specific valueApproved
  9. Click Save.
  10. Under Final Rejection Actions, click Add New | Field Update, and configure it with these values.
    FieldValue
    NameNot Approved
    Field to UpdateApproval  Status
    A Specific valueNot Approved
  11. Click Save.

Great job!  Your Approval Process has been successfully configured.

Approval Actions

We used only ‘Field Update’ in our above example. I would like to explain more regarding Approval Actions like Final Approval Actions, Final Rejection Actions which consists of :

  • Task – If a task is selected then the user can insert a task for a record so for our example on Opportunity once the approval process has been approved/rejected.
  • Email Alert – If an Email Alert is selected then the user will be notified via email once the approval process has been approved/rejected.
  • Field Update – You have already seen an example in the above but again, the system will update the field to the mentioned value once the approval process has been approved/rejected.
  • Outbound Message – This will help notify 3rd Party systems. Think for a scenario where you want to notify the backend system or provisioning system on the approval results so for example once orders are approved start generating the bills then this will help you to achieve the requirement.

Approval Process Actions salesforce

Email to approve the request

We can set the approval process via Email, to enable email approval response use following steps

Setup -> select Process Automation Settings -> select the Enable Email Approval Response checkbox, and click Save.

While responding to an approval request, some words can be used in the first line with periods or exclamatory marks. The words like Approved, Approve, Yes used for approval while Reject, Rejected, No used for rejection.

Difference between workflow rule and approval process

Workflow triggers automatically on any DML action like Insert, Update. It consists of a single step or a single action to continue the process and workflow triggers are not visible to user.

The approval process consists of multiple steps and should be approved by different users at a specific level. It may include rejection also.

For more details on the approval Process, please refer to trailhead salesforce.

Happy Learning 🙂

Permanent link to this article: https://www.sfdcpoint.com/salesforce/approval-process-in-salesforce/

Permanent link to this article: https://www.sfdcpoint.com/salesforce/workbench-saleforce/

Learn salesforce marketing cloud

Learn salesforce marketing cloud

Learn salesforce marketing cloud

What is Salesforce Marketing Cloud?

Salesforce Marketing Cloud is a provider of digital marketing automation and analytics software and services.

Best way to learn salesforce marketing cloud

Most of the people have been a fan of using salesforce marketing cloud since customer mapping journey can be tracked and the companies can use this salesforce marketing cloud data to send personalized campaigns and messages to right people. The salesforce marketing cloud has number of features that increases the productivity of the organization at an alarming rate, and these are analytics builder, journey builder and contact management tool.

Why salesforce marketing cloud

People have shown keen interest to learn salesforce marketing cloud since it offers tons of benefits to the organization.  Using the knowledge of salesforce marketing cloud a marketing cloud consultant can perform a set of following activities in their future workplace which can be discussed as follows:

  • As a marketing cloud consultant, the professional would know the importance of Einstein artificial intelligence and company’s data to make good customer interaction.
  • As a marketing cloud consultant, the professional will know how to create real time management which the customer is the dire need.
  • The professional will know how to get consolidated views from the customer by analyzing known and unknown profiles.
  • Will able to perform detailed marketing reports and optimization, so that customer loyalty can be increased.

Learn how marketing cloud increases the productivity of the company

Well, the knowledge of salesforce marketing could help in delivering impeccable customer service with the help of certain steps. Thus, if you are moving in the direction to learn salesforce marketing cloud then that means you are moving the direction of immense job satisfaction and good pay. Some of the top-notch marketing cloud features that are used to deliver enhanced customer service can be discussed below

1.Helps in making a connection

The connection can be only be made when the data is analyzed properly. So, you can use the knowledge of marketing cloud to connect with each customer. This would mean creating a detailed journey map for each of the customers. When customers will see that you are making an effort to build an on-term relationship with the customer. Then they will automatically notice your company and turn into potential investors.

2.Helps with the Updates

The use of marketing cloud you can make you inform the customers that new updates are available in their platform.  This means before rolling out the updates to the entire salesforce platform, the new updates will reach you first, and after alpha and beta testing of the software you can in incorporate in the salesforce platform.

3. Extension of the application

You can use marketing cloud tools to tailor customer needs. For instance, a customer needs an application that will only deal with the payment getaways, and you can use the knowledge of the marketing cloud to create a payment application according to the needs of the customer.  The feasibility of the marketing cloud can be used to provide a hike in sales of the company.

4. Enhanced security

In marketing cloud, the professionals take care of all the bug fixes that can appear in the Platrom.  So, if you need a clean application that is clean of any bug, then contacting a marketing cloud professional can be good option. The professional will ensure that your application gets constant updates and not subjected to any malware attack.

Why is marketing cloud preferred  than others?

well, marketing cloud has three distinctives features that separate it from the rest.  Those three distinctive advantages will be discussed below:

  • The marketing cloud is a platform that helps in personalizing each and every customer journey.
  • The customer mapping journey can be spread across various channel, devices and customer lifecycle.
  • The platform can be used with other salesforce application, so that means greater insights into the customer’s data can be found out.

Companies that use this platform

Well, the list will include some famous names that have managed to make their company a million-dollar deal since it has used the marketing cloud features to its full potential.  With the use of this platform they have gotten more information about their clients, managed to spread the customer’s information across several devices and customer life cycles and carefully note the conversation with each customer with their company to see the flaws that may have come up.   The names of the company are T mobile, amazon web services, Toyota, US bank and Spotify.

Products that are available in the marketing cloud

Products available How the product is used
Audience studioThe product is used to capture customer information from any open source and then use the data to create an audience based on the customer interaction.
Data studioHere the developers connect with the third-party data providers to get customers insights. The process in done in transparent and in a confidential manner.
Datagram The product joins data from different sources and creates detailed reporting to track the return on investment of the company.
Google analyticsThis product provides insights into the customer experience with a particular product.
Interaction studio This product helps the salesforce professional to connect with the customers in real time.
Email studio The product gets email updates to each and every customer that is working with the company. This is done to avoid personal interaction with each and every customer.
Mobile studio and advertising studio The product helps in sending SMS updates and push messages to the customers.  The advertising studio takes in charge of sending the customers all the social media updates from the company.
Social studioThis product helps in creating customer advocates so that you can reply to the customer feedback


 Final thoughts

From the above information, it should be clear why you should be pursuing a marketing cloud certification. Once you sit for the marketing cloud exam you will be tested on the basis of technical knowledge of the cloud development. So, make sure you make yourself thorough before you appear for the test.  Marketing cloud has been used by all successful companies of today which are the future of tomorrow, so moving in the direction to learn salesforce marketing cloud won’t be a no brainer.

Permanent link to this article: https://www.sfdcpoint.com/salesforce/learn-salesforce-marketing-cloud/

Maximum Trigger Depth Exceeded Error Salesforce

Maximum Trigger Depth Exceeded Error Salesforce

Maximum Trigger Depth Exceeded Error Salesforce occurs mainly due to recursion in the trigger. Recursion can occur because of many reasons. Recursion occurs when the same code is executed again and again. It can lead to an infinite loop and which can result in governor limit sometime. Sometimes it can also result in unexpected output.

In the following trigger, we are checking if contact last name is not equal to SFDC, then we are preparing set of account id. Now let’s assume that we are updating account record in this trigger and there is one more trigger which updates contact record when accounts are updated

trigger SampleTrigger on Contact (after update){
    Set<String> accIdSet = new Set<String>(); 	
    for(Contact conObj : Trigger.New){
        if(conObj.LastName != 'SFDC'){
            accIdSet.add(conObj.accountId);
        }
    }
    // Use accIdSet in some way to update account
}

We will get an error in the above example if there is recursion Maximum Trigger Depth Exceeded Error.

Solution to resolve Maximum Trigger Depth Exceeded Error Salesforce

To avoid these kind of situation we can use public class static variable. We can solve this issue, you can set a condition on trigger so it will not be called recursively.

In RecursiveTriggerHandler class, we have a static variable that is set to true by default.

public class RecursiveTriggerHandler{
    public static Boolean isFirstTime = true;
}

In the following trigger, we are checking if the static variable is true only then trigger runs. Also, we are setting a static variable to false when trigger runs for the first time. So if the trigger will try to run second time in the same request then it will not run.

trigger SampleTrigger on Contact (after update){
    Set<String> accIdSet = new Set<String>();
    if(RecursiveTriggerHandler.isFirstTime){
        RecursiveTriggerHandler.isFirstTime = false;
        for(Contact conObj : Trigger.New){
            if(conObj.name != 'SFDC'){
                accIdSet.add(conObj.accountId);
            }
        }
        // Use accIdSet in some way to update account
    }
}

For more details refer to Avoid recursive trigger in salesforce using static variable

Permanent link to this article: https://www.sfdcpoint.com/salesforce/maximum-trigger-depth-exceeded-error-salesforce/

Triggers in Salesforce

Apex Triggers in Salesforce

Apex Triggers in Salesforce

What is Triggers in Salesforce?

A trigger is an Apex script that executes before or after data manipulation language (DML) events occur. Apex triggers enable you to perform custom actions before or after events to record in Salesforce, such as insertions, updates, or deletions. Just like database systems support triggers, Apex provides trigger support for managing records.

Triggers in Salesforce


When to use salesforce triggers

We should use triggers to perform tasks that can’t be done by using the point-and-click tools in the Salesforce user interface. For example, if validating a field value or updating a field on a record, use validation rules and workflow rules instead.

What is Trigger Syntax?

trigger TriggerName on ObjectName (trigger_events) {
   code_block
}

Trigger events in salesforce?

A trigger is a set of statement which can be executed on the following events. In above trigger events one or more of below events can be used with comma-separated.

Here is a list of trigger events in salesforce

  • before insert
  • before update
  • before delete
  • after insert
  • after update
  • after delete
  • after undelete

What are different type of Triggers?

There are two types of triggers:

  • Before triggers are used to perform a task before a record is inserted or updated or deleted. These are used to update or validate record values before they are saved to the database.
  • After triggers are used if we want to use the information set by Salesforce system and to make changes in the other records. are used to access field values that are set by the system (such as a record’s Id or LastModifiedDate field), and to affect changes in other records. The records that fire the after trigger are read-only.

What are the considerations while implementing the Triggers?

Consider the following before implementing the triggers.

  • Upsert trigger fires on 4 different events :- before(insert, update), after (insert, update)
  • Merge trigger are fired on both events on delete
  • Field history is updated after the trigger has successfully finished processing data.
  • Any callout should be asynchronous so that trigger does not have to wait for the response.
  • A trigger cannot have a static keyword in its code.
  • If a trigger completes successfully the changes are committed to the database and if it fails the transaction is rolled back.

Read the Apex Developer Guide for more detailed considerations.

What are context variables in triggers?

All triggers define implicit variables that allow developers to access run-time context. These variables are contained in the System.Trigger class.

Here is list of context variables in triggers

  • isExecuting: Returns true if the current context for the Apex code is a trigger, not a Visualforce page, a Web service, or an executeanonymous() API call.
  • isInsert: Returns true if this trigger was fired due to an insert operation, from the Salesforce user interface, Apex, or the API.
  • isUpdate: Returns true if this trigger was fired due to an update operation, from the Salesforce user interface, Apex, or the API.
  • isDelete: Returns true if this trigger was fired due to a delete operation, from the Salesforce user interface, Apex, or the API.
  • isBefore: Returns true if this trigger was fired before any record was saved.
  • isAfter: Returns true if this trigger was fired after all records were saved.
  • isUndelete: Returns true if this trigger was fired after a record is recovered from the Recycle Bin (that is, after an undelete operation from the Salesforce user interface, Apex, or the API.)
  • new: Returns a list of the new versions of the sObject records. This sObject list is only available in insert, update, and undelete triggers, and the records can only be modified in before triggers.
  • newMap: A map of IDs to the new versions of the sObject records. This map is only available in before update, after insert, after update, and after undelete triggers.
  • old : Returns a list of the old versions of the sObject records. This sObject list is only available in update and delete triggers.
  • oldMap: A map of IDs to the old versions of the sObject records. This map is only available in update and delete triggers.
  • size: The total number of records in a trigger invocation, both old and new.

Refer to Trigger context variables in salesforce link for more details.

Context Variable Considerations

Trigger EventCan change fields using trigger.newCan update original object using an update DML operationCan delete original object using a delete DML operation
before insertAllowed.Not applicable. The original object has not been created; nothing can reference it, so nothing can update it.Not applicable. The original object has not been created; nothing can reference it, so nothing can update it.
after insertNot allowed. A runtime error is thrown, as trigger.new is already saved.Allowed.Allowed, but unnecessary. The object is deleted immediately after being inserted.
before updateAllowed.Not allowed. A runtime error is thrown.Not allowed. A runtime error is thrown.
after updateNot allowed. A runtime error is thrown, as trigger.new is already saved.Allowed. Even though bad code could cause an infinite recursion doing this incorrectly, the error would be found by the governor limits.Allowed. The updates are saved before the object is deleted, so if the object is undeleted, the updates become visible.
before deleteNot allowed. A runtime error is thrown. trigger.new is not available in before delete triggers.Allowed. The updates are saved before the object is deleted, so if the object is undeleted, the updates become visible.Not allowed. A runtime error is thrown. The deletion is already in progress.
after deleteNot allowed. A runtime error is thrown. trigger.new is not available in after delete triggers.Not applicable. The object has already been deleted.Not applicable. The object has already been deleted.
after undeleteNot allowed. A runtime error is thrown.Allowed.Allowed, but unnecessary. The object is deleted immediately after being inserted.

Salesforce Trigger Example

before insert trigger salesforce

Account trigger to set account rating as ‘Hot’ if account industry is ‘Banking’ or ‘Healthcare’

before update trigger salesforce

trigger AccountCustomTrigger on Account (before insert, before update) {
    for(Account acc : Trigger.New) {
        if(acc.Industry != null && (acc.Industry == 'Banking' || acc.Industry == 'Healthcare')){
         acc.Rating = 'Hot';
        }
    }
}

Please note that in the above example we are not manually updating accounts using DML statement as it is before insert or before update trigger.

after insert trigger salesforce

Let us see one more example of a trigger on contact which will create Account record whenever contact is created without an account.

trigger ContactCustomTriggerExample on Contact (after insert) {
    List<Account> accListToInsert = new List<Account>();
    for(Contact con : Trigger.New) {
        //check if account is null on contact
        if(con.AccountId == null ) {
            Account acc = new Account();
            //Add all required field on Account
            acc.Name = con.LastName;
            acc.Phone = con.Phone;
            accListToInsert.add(acc);
        }
    }
    if(!accListToInsert.isEmpty()){
    insert accListToInsert;
    }
} 

Define Recursive Trigger and how to avoid it?

There is a possibility that the result of the trigger can end up calling the same trigger again and can run in a loop, this is known as a recursive trigger. To avoid this scenario we should create a static variable and check the value of this variable before we execute anything in the trigger. For more details refer to below link:

Avoid recursive trigger in salesforce

What do you mean by the bulkifying trigger?

A trigger should be able to handle single record and thousands of record. There are two important point for bulkifying trigger:

  • Write triggers that operate on collections of sObjects.
  • Write triggers that perform efficient SOQL and DML operations.

If we will not follow above point we may hit governor limit when records are created/updated/deleted in mass using data loader or other tool.

Bulk Apex Trigger trailhead

For more detail about trigger in salesforce refer Official link

For interview questions related to salesforce refer to  Salesforce Interview Questions on Triggers

Permanent link to this article: https://www.sfdcpoint.com/salesforce/apex-trigger-in-salesforce/

aura method in lightning salesforce

aura method in lightning salesforce

aura method in lightning salesforce

Use aura:method to define a method as part of a component’s API. This enables you to directly call a method in a component’s client-side controller instead of firing and handling a component event. Using aura:method simplifies the code needed for a parent component to call a method on a child component that it contains.

Here is a list of attributes for aura method in lightning salesforce

AttributeTypeDescription
nameStringThe method name. Use the method name to call the method in JavaScript code.
actionExpressionThe client-side controller action to execute.
accessStringThe access control for the method. Valid values are:
public—Any component in the same namespace can call the method. This is the default access level.
global—Any component in any namespace can call the method.
descriptionStringThe method description.

An aura:method can optionally include parameters. Use an aura:attribute tag within an aura:method to declare a parameter for the method.

Example of aura:method

In this example, we are creating a Child component aura method with two parameters. These two parameters are ‘childGreetingParam’ and ‘ChildPersonName’. These parameters are having a default value of ‘Hello’ and ‘World’ respectively.

ChildComponent

<aura:component>
    <aura:method name="childMessageMethod" action="{!c.getMessage}" access="public">
        <aura:attribute name="childGreetingParam" type="String" default="Hello"/> 
        <aura:attribute name="childPersonNameParam" type="String" default="World"/> 
    </aura:method>
</aura:component>

ChildComponentController

In Child Component controller, we are getting the value of parameters and showing alert.

({
    getMessage : function(component, event) {
        //get method paramaters
        var params = event.getParam('arguments');
        if (params) {
            var param1 = params.childGreetingParam;
            var param2 = params.childPersonNameParam;
            alert(param1 + " " + param2);
        }
    }
})

ParentComponent

In the parent component, child component is added and button for calling parent component controller method.

<!--Parent cmp-->
<aura:component>  
    <div class="slds-m-around_xx-large">
        <!-- Add Child Component -->
        <c:ChildComponent aura:id="childCmp"/>
        <!-- On button click child aura:method will be called-->
        <lightning:button variant="brand" label="Call Child" onclick="{!c.callAuraMethod}" />
    </div>
</aura:component>

ParentComponentController

In ParentComponetController, we are simply finding child component and calling its aura method.

({
    callAuraMethod : function(component, event, helper) {
        //Call Child aura method
        var childComponent = component.find("childCmp");
        var message = childComponent.childMessageMethod();
    }
})

Using AuraMethodSample app for testing

<aura:application extends="force:slds">
    <c:ParentComponent/>
</aura:application>

Here is output when user clicks on Call child button. Output is ‘Hello World’ because no value of parameter is passed. So it is showing default value.

aura method in lightning salesforce

In the above example, we are using parameters of the child component. We can also pass parameters from parent component to child component like this:

({
    callAuraMethod : function(component, event, helper) {
        //Call Child aura method
        var childComponent = component.find("childCmp");
        var message = childComponent.childMessageMethod('Happy Coding','Readers');
    }
})

Now when the user will click on the ‘Call Child’ button on the parent component. The output will be ‘Happy Coding Readers’ instead of ‘Hello World’ because we are passing the value of attributes.

aura:method always executes synchronously so method execution finishes before it returns.

For more details please refer below link https://developer.salesforce.com/docs/atlas.en-us.lightning.meta/lightning/ref_tag_method.htm

For more post related to salesforce lightning refer Salesforce lightning sfdcpoint link

Happy Coding 🙂

Permanent link to this article: https://www.sfdcpoint.com/salesforce/aura-method-in-lightning-salesforce/

salesforce order of execution

Salesforce order of execution

What is salesforce order of execution?

What is order of execution in salesforce?

Salesforce order of execution

When you save a record with an insertupdate, or upsert statement, Salesforce performs the following events in order.

Before Salesforce executes these events on the server, the browser runs JavaScript validation if the record contains any dependent picklist fields. The validation limits each dependent picklist field to its available values. No other validation occurs on the client side.

Salesforce order of execution

Salesforce order of execution


Here is an order of execution in salesforce

  • The original record is loaded from the database.
  • System Validation Rules.
  • Executes record-triggered flows that are configured to run before the record is saved.
  • Executes all before triggers.
  • Custom Validation rules.
  • Executes duplicate rules.
  • Saves the record to the database, but doesn’t commit yet.
  • Executes all after triggers.
  • Executes assignment rules.
  • Executes auto-response rules.
  • Executes workflow rules. If there are workflow field updates, updates the record again.
  • If the record was updated with workflow field updates, fires before and after triggers one more time. Custom validation rules, flows, duplicate rules, processes, and escalation rules are not run again.
  • Executes escalation rules.
  • Executes processes and flows launched via processes and flow trigger workflow actions.
  • Executes entitlement rules.
  • Executes record-triggered flows that are configured to run after the record is saved.
  • If the record contains a roll-up summary field or is part of a cross-object workflow, performs calculations and updates the roll-up summary field in the parent record. Parent record goes through save procedure.
  • If the parent record is updated, and a grandparent record contains a roll-up summary field or is part of a cross-object workflow, performs calculations and updates the roll-up summary field in the grandparent record. Grandparent record goes through save procedure.
  • Executes Criteria Based Sharing evaluation.
  • Commits all DML operations to the database.
  • Executes post-commit logic, such as sending email.


Here is an order of execution in salesforce in more detail:

On the salesforce server,

  1. Loads the original record from the database or initializes the record for an upsert statement.
  2. Loads the new record field values from the request and overwrites the old values.

    If the request came from a standard UI edit page, Salesforce runs system validation to check the record for:

    • Compliance with layout-specific rules
    • Required values at the layout level and field-definition level
    • Valid field formats
    • Maximum field length

    When the request comes from other sources, such as an Apex application or a SOAP API call, Salesforce validates only the foreign keys. Before executing a trigger, Salesforce verifies that any custom foreign keys do not refer to the object itself.

    Salesforce runs user-defined validation rules if multiline items were created, such as quote line items and opportunity line items.

  3. Executes record-triggered flows that are configured to run before the record is saved.
  4. Executes all before triggers.
  5. Runs most system validation steps again, such as verifying that all required fields have a non-null value, and runs any user-defined validation rules. The only system validation that Salesforce doesn’t run a second time (when the request comes from a standard UI edit page) is the enforcement of layout-specific rules.
  6. Executes duplicate rules. If the duplicate rule identifies the record as a duplicate and uses the block action, the record is not saved and no further steps, such as after triggers and workflow rules, are taken.
  7. Saves the record to the database, but doesn’t commit yet.
  8. Executes all after triggers.
  9. Executes assignment rules.
  10. Executes auto-response rules.
  11. Executes workflow rules. If there are workflow field updates
    • Updates the record again.
    • Runs system validations again. Custom validation rules, flows, duplicate rules, processes, and escalation rules are not run again.
    • Executes before update triggers and after update triggers, regardless of the record operation (insert or update), one more time (and only one more time)


  12. Executes escalation rules.
  13. Executes the following Salesforce Flow automations, but not in a guaranteed order.
    • Processes
    • Flows launched by processes
    • Flows launched by workflow rules (flow trigger workflow actions pilot)

    When a process or flow executes a DML operation, the affected record goes through the save procedure.

  14. Executes entitlement rules.
  15. Executes record-triggered flows that are configured to run after the record is saved.
  16. If the record contains a roll-up summary field or is part of a cross-object workflow, performs calculations and updates the roll-up summary field in the parent record. Parent record goes through save procedure.
  17. If the parent record is updated, and a grandparent record contains a roll-up summary field or is part of a cross-object workflow, performs calculations and updates the roll-up summary field in the grandparent record. Grandparent record goes through save procedure.
  18. Executes Criteria Based Sharing evaluation.
  19. Commits all DML operations to the database.
  20. After the changes are committed to the database, executes post-commit logic such as sending email and executing enqueued asynchronous Apex jobs, including queueable jobs and future methods.

Additional Considerations

Note the following when working with triggers.

  • If a workflow rule field update is triggered by a record update, Trigger.old doesn’t hold the newly updated field by the workflow after the update. Instead Trigger.old holds the object before the initial record update was made. For example, an existing record has a number field with an initial value of 1. A user updates this field to 10, and a workflow rule field update fires and increments it to 11. In the update trigger that fires after the workflow field update, the field value of the object obtained from Trigger.old is the original value of 1, and not 10.
  • If a DML call is made with partial success allowed, triggers are fired during the first attempt and are fired again during subsequent attempts. Because these trigger invocations are part of the same transaction, static class variables that are accessed by the trigger aren’t reset.
  • The order of execution isn’t guaranteed when having multiple triggers for the same object due to the same event. For example, if you have two before insert triggers for Case, and a new Case record is inserted that fires the two triggers, the order in which these triggers fire isn’t guaranteed.
  • If an object has multiple active record-triggered flows that are configured to run before or after the record is saved, the order in which those flows are executed isn’t guaranteed.
  • To learn about the order of execution when you insert a non-private contact in your org that associates a contact to multiple accounts, see AccountContactRelation.

Please refer to below official link for salesforce order of execution:

Trigger and Order of Execution

For interview questions related to trigger, refer to the below link:

Salesforce Interview Questions on Triggers

Permanent link to this article: https://www.sfdcpoint.com/salesforce/salesforce-order-of-execution/

Guest Post

Guest Post sfdcpoint

Guest Post to sfdcpoint.com Want to contribute an article to sfdcpoint.com? Please share your post to dureja.ankush90@gmail.com. Purpose of sfdcpoint.com is to share knowledge with salesforce community. So all of you are welcome to post your article on sfdcpoint.com.

Here are some of tips for post:

  • Article Quality : Try to write an article with more than 300 words.
  • Screenshot: Sometime image speaks more than words. So its advisable to add some screenshot.
  • Video: If possible, add some video for demo. Its not necessary.

Send your article to dureja.ankush90@gmail.com with subject line sfdcpoint guest post. We will review your post. Once approved we will post your article to sfdcpoint with your name. You will also be rewarded with some goodies.

Good Luck 🙂


Permanent link to this article: https://www.sfdcpoint.com/salesforce/guest-post/