Page Contents
Salesforce Winter ’20 Release Notes
All you need to know about Salesforce Winter ’20 Release Notes
We understand that it is difficult and a bit time-consuming to go through the entire release so here we offer to help you learn and grow in the salesforce world by presenting the summary and my most favorite feature of Salesforce Winter’ 20 Release Notes.
Top Features in Salesforce Winter ’20 Release Notes
Turning on Lightning Experience for all users
The Lightning Experience will be activated for all orgs from Winter ’20. Once you enable the Lightning Experience, it’s there for good. After enabling it in the Lightning Transition Assistant, you will not be able to disable it. However, you can still switch between Lightning and Classic. But we strongly recommend you keep using lightning because it is the future of CRM.
Launch into Lightning Experience Apps with the Mobile App Launcher:
Accessing Recycle Bin in a Lightning experience
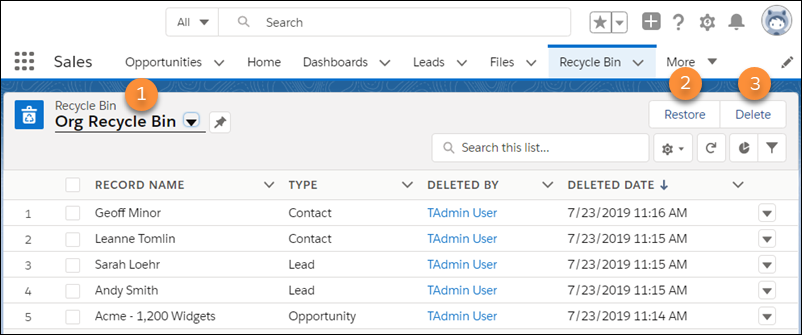
The Recycle Bin in Lightning Experience works the same as it does in Salesforce Classic, except for a few differences. In Lightning Experience:
- The org’s Recycle Bin is called Org Recycle Bin (1). The Salesforce Classic name is All Recycle Bin.
- Restore records by clicking Restore (2) instead of Undelete in Salesforce Classic.
- Permanently delete records by selecting them and clicking Delete (3) versus Undelete or Empty in Salesforce Classic.
- You can’t view or restore reports and dashboards. Switch to Salesforce Classic to access them in the Recycle Bin.
Schedule Flows
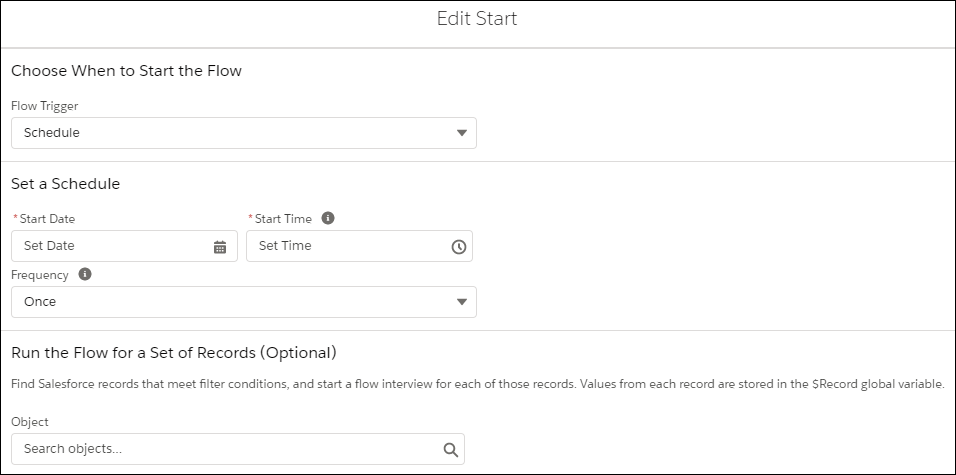
To start a flow for a set of records, select the filter conditions in the Start element. When your flow starts, a flow interview runs for each record that matches your filter—no looping required. The matching record is stored in the $Record global variable, so you can reference the variable or its fields throughout your flow.
Add a Signature to Email Templates
With the new {{{Sender.Signature}}} merge field, email template creators can include a sender’s existing signature in an email template. The field is available wherever the merge field picker exists, including in emails, list emails, and enhanced letterheads.
Setup:
- Users set up their signature in My Email Settings.
- In the merge picker, the {{{Sender.Signature}}} merge field is listed as Email Signature.
Opportunity Contact Roles
- See the impact on revenues and opportunity close rates from specific roles
- Help you target contacts for campaign-based marketing
- With the new data you capture, such as revenue, product interest, and scoring data
Automate Account Team Creation with Process Builder
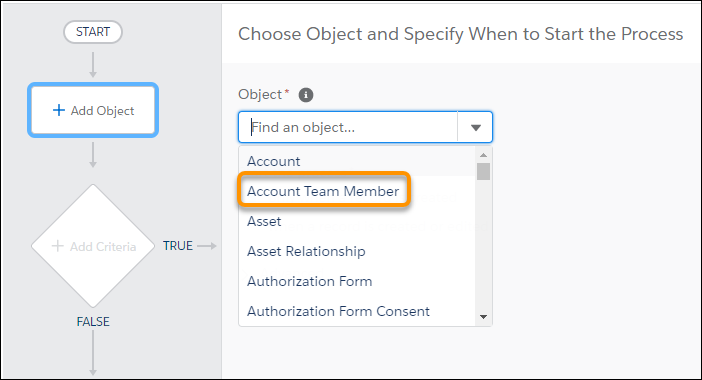
Configure a process action to add team members to an account. You can also configure a process to run when an account team member record is created or edited.
Setup: If account teams are enabled in your org, the Account Team Member object is available when you set up the process trigger.
Use Flow Builder to Send Custom Notifications:
You can use Flow Builder to send customized notifications when important events occur. Previously, custom notification actions were fully supported only in Process Builder.
In Setup, search for Notification Builder and create a Custom Notification Type.
Then add the Send Custom Notification action to an action in Flow Builder, and select your Notification Type ID.
Set File Sharing to Inherit Record Settings:
When attaching files to records, you can have the files inherit the sharing settings of those records. For instance, when a user can edit a record, you want them to be able to edit the files on that record, too. Now you can set the default sharing permissions on files that are attached to records. The preference lets files follow the sharing settings of the record.
Setup : For new orgs, this preference is auto-enabled, and files on records are set to Set by Record by default. For existing orgs, go to Setup and enter Files in the Quick Find box. Under Salesforce Files, choose General Settings. Enable the preference Set file access to Set by Record for files attached to records.
Lightning Web Components is now Open Source
The Lightning Web Components framework is now open source, empowering you to explore the source code, customize the framework to your needs, and build enterprise-ready web components on any platform, not just Salesforce.
Setup: To develop off-platform Lightning web components, see lwc.dev. To contribute to the open-source code, see the Lightning Web Components GitHub repository.
Add Lightning Web Components as Custom Tabs.
Make a Lightning web component available as a custom tab in a Lightning Experience app and in the Salesforce app.
Setup:
- Add the lightning__Tab target to the component’s configuration file. The <component>.js-meta.xml configuration file defines the metadata values for the component, including the setting to allow usage in a custom tab.
<?xml version="1.0" encoding="UTF-8"?>
<LightningComponentBundle xmlns="http://soap.sforce.com/2006/04/metadata">
    <targets>
        <target>lightning__Tab</target>
    </targets>
</LightningComponentBundle>
- Create a custom tab for this component.
- To display the component in a custom tab:
- For a Lightning Experience app, add the component to the App Launcher.
- For the Salesforce mobile app, add the component to the Salesforce app navigation menu.
Control Who Gets Read Access to Custom Metadata Types
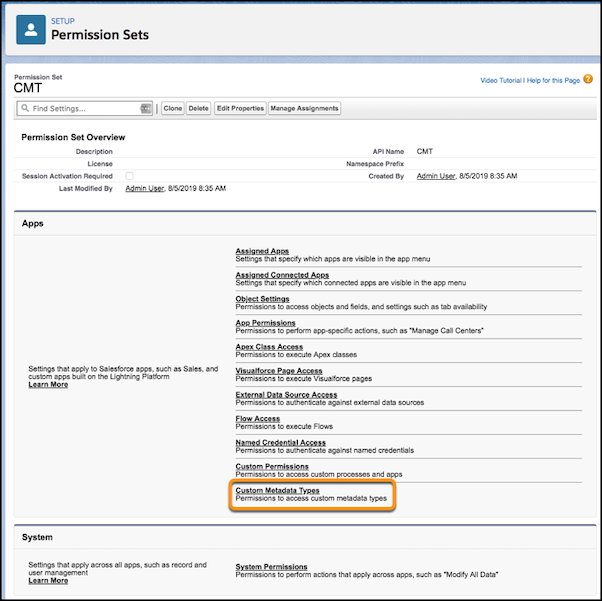
Use profiles and permission sets to assign read access to users for custom metadata types. As of Spring ’19, you can block all API read access to custom metadata types for users who don’t have Customize Application permission. Now you can grant API read access to specific metadata types for users and user profiles, even if they don’t have the Customize Application permission.
Setup:
To grant a specific profile or permission set read access to a custom metadata type, go to the Custom Metadata Types permissions.
Filter Reports Using Field Comparisons with Field-To-Field Filters (Beta):
Wow!!! I am sure lot of people were waiting for this and now the wait is over.
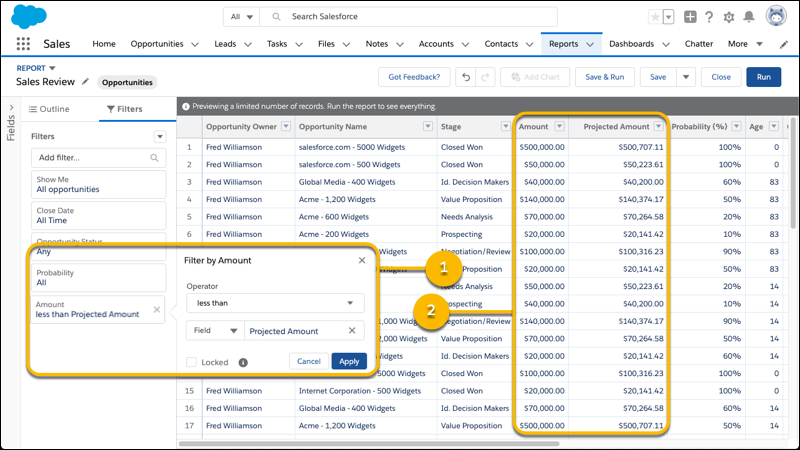
Filter a report by comparing the values of two different report fields. For example, see which cases were modified after the closing date by filtering on cases with a last modified date after the closed date.
In Setup, in Reports and Dashboards Settings, select Enable Field-to-Field Filtering in Reports (Lightning Experience Only) and click Save.
Add a field filter, and change Value to Field in the filter dialog. In this example, a field-to-field filter (1) returns opportunities worth less than projected (2).
Salesforce Winter ’20 Release Dates
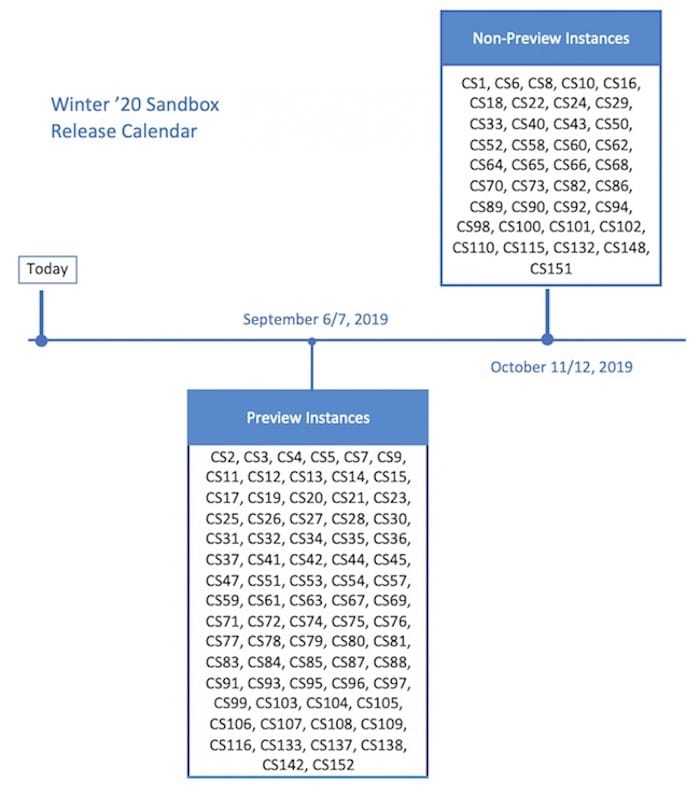
The Winter ’20 release will be globally available on October 14, 2019.
Salesforce Winter ’20 Schedule Calendar
For more details, please visit salesforce website





Recent Comments