
In this article, I will cover a step by step guide for using Salesforce Command Line Interface Data Loader:
So first of all what is Command Line Interface Data Loader, and why should we use it from Command Line when there is already a visual user interface provided? Well, the answer is:
- You can automate the data loading process using the CLI data loader. Suppose you want some data from your org to be extracted every night.
- You may want a CSV file which is kept at a particular location on a machine, to be uploaded into an org at a fixed time.
NOTE: The CLI data loader functionality is only available for Windows Operating System.
Prerequisites for using CLI Data Loader:
- First of all, make sure you have the Admin rights on the machine.
- Then, download the data loader setup file on the machine by going into Salesforce environment Setup –> Data Management –> Data Loader. Choose the option “Download Data Loader for Windows“. It will download the latest version of data loader setup file. Install it by following the setup wizard.
- Also, you need to have the required version of JRE (Java Run Time Environment). Go to step a and b only if you don’t have the JRE already on the system, otherwise only check step c.
- Download the latest JRE version from Oracle site downloads page.
- Install the downloaded JRE file.
- Setup the environment variables and then check the installation by following the steps given by Mr. Arun on this link: Setup Environment Variables Java
Before going to further steps:
- Validate your data loader directory looks like below screenshot.
- Make sure that you validate the JRE installation and version by hitting Java -version command on your Command Prompt Window as shown in the screenshot below.
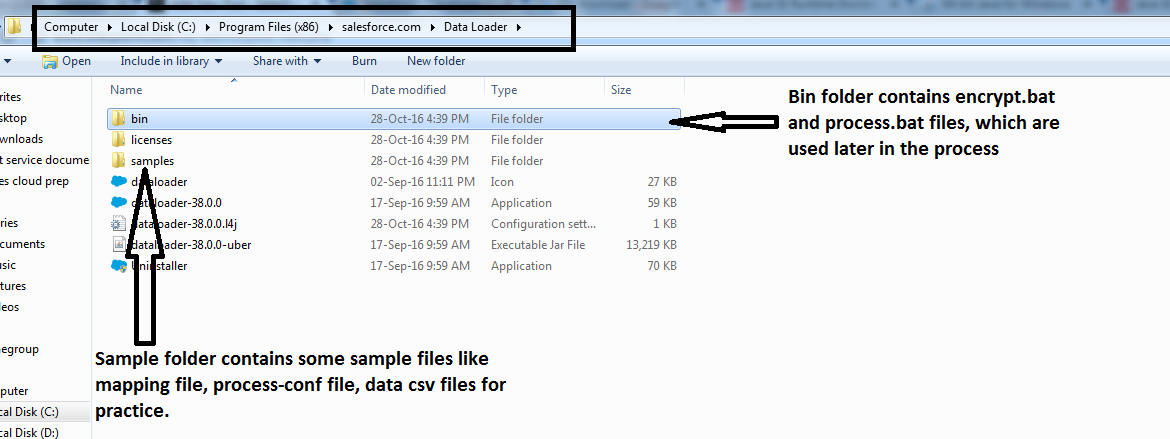
data loader directory structure

All Looks good? Yes? Okay, let’s start step by step on how to use Salesforce CLI Data Loader now:
Step 1: Prepare your key for encrypting the password of your org:
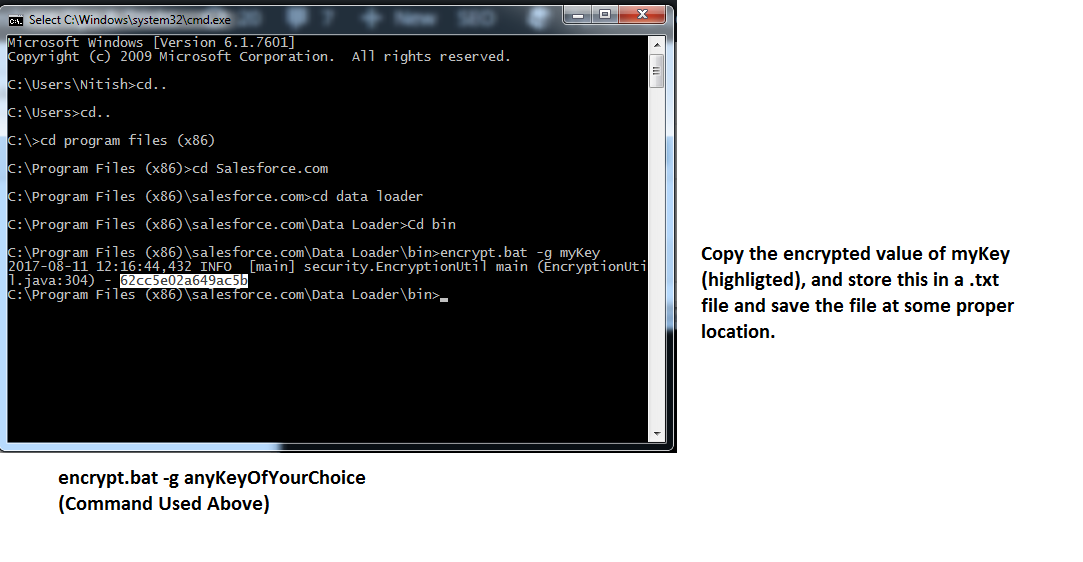
- Open the command prompt window, and navigate to the bin folder of data loader directory (steps shown in screenshot below). We need to navigate to bin location, because encrypt.bat and process.bat both files exists here at this location.
- Use the command encrypt.bat -g anyKeyTextOfYourChoice . You can use any text you want to use as an Encryption key. In my screenshot, I have used myKey, but you can use any of your choice.
- Once you will hit enter, it will show you the encrypted version of your text. Copy that value (highlighted in screenshot), and save it in a .txt file and save the file at some proper location on your machine. It will be used in further steps. I have saved mine at “D:\data loader files\encryptionKey.txt” location.
Prepare the encryption key
Step 2: Encrypt your Salesforce environment password by using the encrypted key prepared above.
- On the same Command Prompt Window, use the command encrypt.bat -e <yourOrgPassword> <location of the txt file with encrypted key>
- Our command was like: encrypt.bat -e nitish$0413 “D:\data loader files\encryptionKey.txt”.
- Copy the encrypted value of your password, we will use in further steps when creating process-conf.XML file.
Step 3: Create the mapping file and save it in .sdl format
- You need to create the mapping file by putting the CSV file header name on left side and Salesforce API name on right side.
- Save the file in .sdl format on your machine.
- If there are multiple fields and complex mapping, you can also take help of Dataloader field mapping UI, and save the mapping file from there instead of creating everything manually.
Note: Make sure that API Name of fields should be exactly as in Salesforce. The API names are on the right-hand side of the = character in the mapping file. Capital and Small letters also make a difference and you may face issues.
#Mapping values created by Nitish on 11th Aug
NAME=Name
INDUSTRY=Industry
NUMBEROFEMPLOYEES=NumberOfEmployees
Here is the screenshot of our CSV file which we are gonna upload:
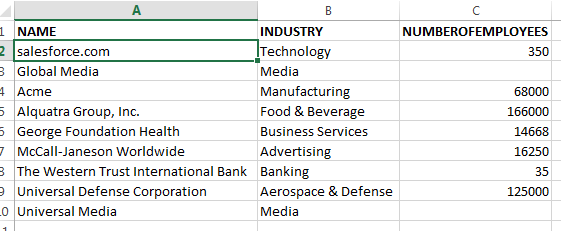
CSV File Screenshot
Step 4: Prepare the process-conf.XML file according to our requirements
- One sample process-conf.XML file has already been given in the data-loader directory Samples folder.
- Copy that sample file and paste in the location at D drive, where we stored the encryptionKey.txt file as well.
- Keep all other files like mapping file, data files at the same location, which is “D:\data loader files”.
- Edit the process-conf.XML file now and change the contents of the file as given below. This file contains the information and specifications about all the operations you need to perform in your data load. For ex:
- What is the action you want to perform (insert, update, export etc.)
- Your username
- Password (encrypted)
- Instance Name
- Success error file location
- Few others as shown in the text.
<!DOCTYPE beans PUBLIC "-//SPRING//DTD BEAN//EN" "http://www.springframework.org/dtd/spring-beans.dtd">
<beans>
 <bean id="accountInsert" class="com.salesforce.dataloader.process.ProcessRunner" singleton="false">
 <description>accountInsert job gets the account record from the CSV file and inserts it into Salesforce.</description>
 <property name="name" value="accountInsert"/>
 <property name="configOverrideMap">

<map>
  <entry key="sfdc.debugMessages" value="true"/>
  <entry key="sfdc.debugMessagesFile" value="D:\accountInsertSoapTrace.log"/>
  <entry key="sfdc.endpoint" value="https://login.salesforce.com"/>
  <entry key="sfdc.username" value="yourusername@gmail.com"/>
  <entry key="sfdc.password" value="148d6c06b76cdc88415aa34c673e00ed3423a42"/>
  <entry key="process.encryptionKeyFile" value="D:\data loader files\encryptionKey.txt"/>
  <entry key="sfdc.timeoutSecs" value="600"/>
  <entry key="sfdc.loadBatchSize" value="200"/>
  <entry key="sfdc.entity" value="Account"/>
  <entry key="process.operation" value="insert"/>
  <entry key="process.mappingFile" value="D:\data loader files\accountInsertMap.sdl"/>
  <entry key="dataAccess.name" value="D:\data loader files\accountDataToInsert.csv"/>
  <entry key="process.outputSuccess" value="D:\data loader files\accountDataToInsertSuccess.csv"/>
  <entry key="process.outputError" value="D:\data loader files\accountDataToInsertLogError.csv"/>
  <entry key="dataAccess.type" value="csvRead"/>
  <entry key="process.initialLastRunDate" value="2017-08-10T00:00:00.000-0800"/>
</map>

</property>
</bean>
</beans>
Step 4: Hit the final command, and run the process for data load.
- You need to be at the same location as shown in above CMD screenshots, because process.bat file resides there only.
- Hit the command process.bat “<file path to process-conf.xml>” <process name>
- Replace <file path to process-conf.xml> with the path to the directory containing process-conf.xml & replace <process name> with the process specified in process-conf.xml.
- In our case, it was process.bat “D:\data loader files” accountInsert. accountInsert is the process name mentioned in the process-conf.XML file.
- process-conf.XML file can contain many processes and you need to run one at a time by using the above command.
Once the process is run, the success and error CSV files will be available at the location you mentioned in process-conf.XML file.
Now you have learned how to use data loader CLI version to load the data, you can also schedule mutiple operations by creating a .bat file and write multiple commands to execute multiple processes one by one. You can get more information about creating .bat file in the PDF at the link below. Check out the last paragraph on P.6 of the cheatsheet for an example:
Note: You should also take a look at the process-conf.XML file provided in samples folder of data loader default directory, to understand some other tags needed to upsert, export operations of data loading.
Related Posts:
Data Loader Command Line Introduction
Command line dataloader in Salesforce – Solve Common errors
Good luck for data loading! 🙂
8 comments
1 ping
Skip to comment form
Awesome Nitish. Thanks for the post 🙂
Author
Thanks Hari for reading the post! Sharing the knowledge is our main motive. Cheers! 🙂
Can you please show how to this for extraction daily using dataloader_45?
I’m getting weird errors like :
Caused by: java.security.GeneralSecurityException: Error to decrypt message:
at com.salesforce.dataloader.security.EncryptionAesUtil.decryptMsg(EncryptionAesUtil.java:217)
at com.salesforce.dataloader.config.Config.decryptProperty(Config.java:715)
… 6 more
Caused by: java.lang.NumberFormatException: For input string: “lp”
at java.base/java.lang.NumberFormatException.forInputString(NumberFormatException.java:65)
at java.base/java.lang.Integer.parseInt(Integer.java:652)
at java.base/java.lang.Integer.valueOf(Integer.java:957)
at java.base/java.lang.Integer.decode(Integer.java:1427)
at com.salesforce.dataloader.security.EncryptionUtil.textToBytes(EncryptionUtil.java:40)
at com.salesforce.dataloader.security.EncryptionAesUtil.decryptMsg(EncryptionAesUtil.java:213)
Hi Victor, are you able to resolve this issue? Can you share more details if you couldn’t
It looks like your data has a string value when it’s expecting a number.
Hi, how to automate the contacts insert after account insert using Dataloader CLI
You can use task scheduler in windows system to automate the load and set the time of load for contact data 1 hour after the account data.
Hi! this would be the easiest & quickest way to populate a Sandbox (partial copy) with some more data that was not included on creation?
Thank you for the article.
Great blog that I enjoyed reading.